
User Manual
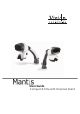


Mantis Compact with Universal Stand - User Guide www.visioneng.com/support
English
6
MANTIS COMPACT
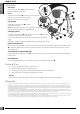
Packing Contents
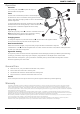
Assembly
1 Secure the universal mount to the work
surface using the G-clamp provided or by
using appropriate screws located in the
holes of the mount.
2 Place the universal arm on top of the
universal mount and lower it on to the
spigot until it is fully mounted.
3 Loosen the upper retaining bolt in the
universal arm. Remove the lower retaining
bolt
. Carefully place the locating hook
of the Mantis viewing head
over the
upper retaining bolt of the universal arm.
Replace the lower retaining bolt
, ensuring
that the bolt passes through the lower locating mount
of the Mantis viewing head.
Tighten the upper and lower retaining bolts then re-seat the universal arm rubber
gaiter
.
4 Remove the red transit plug from the underneath of the viewing head.
5 Fit and lock the chosen objective lens into the objective seat.
6 Ensuring the power adapter is suitable for your supply voltage, connect the power adapter
plug to a suitable power outlet and its output connector to the base of the universal arm.
7 Connect the output lead at the top of the universal arm to the rear of the viewing head.
Do not attempt to connect the power adapter directly to the viewing head.
Universal mount
G-clamp
Counter balanced boom stand
Viewing head
Power adapter
Objective lens
Desiccant Replacement
The desiccant removes excess moisture from the optical
head.
Disconnect the power supply from the bottom of the
head.
Remove the screw securing the desiccant cover and lift
the cover off.
Insert the new desiccant and replace the desiccant cover.
LED Arrays
Remove the desiccant cover .
Remove the two crosshead screws that secure the LED
array
and remove the array complete with filters .
Reassembly is the reverse of this procedure.
Routine Maintenance