
User manual


Phantom Help File204
© 2010 Vision Research - An AMETEK Company
b)
Slide the Threshold slider to the right to increase the Threshold, or to the left to reduce the
Threshold.
2)
Area %
The Area % specifies the percentage of the auto-trigger region that must be active in order
for an auto-trigger event to be generated. A typical percentage value is 10.
a)
Click the up/down arrows to the right of the Area % entry window to specify the Area %
value, or
b)
Slide the Area % slider to the right to increase the Area %, or to the left to reduce the Area
%.
3)
Check Interval (ms)
The Check Interval (ms) parameter specifies the speed between updates the auto-trigger
region is checked.
a)
Click the up/down arrows to the right of the Check Interval (ms) entry window to specify
the Check Interval (ms) value, alternatively
b)
Slide the Check Interval (ms) slider to the right to increase the Check Interval (ms), or to
the left to reduce the Check Interval (ms).
d.
Define the Image-Based Auto-Trigger Area by:
1)
Manually entering the XY coordinates of the Top, Left, Right, and Bottom pixels defining the
Area.
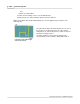
a)
Place the cursor over the image, to the upper left-hand corner or the area of interest, in
the selected Phantom camera's Preview Panel, and note the XY: values in the Preview
Panel Status Bar.
b)
Enter the X value in the Area Left entry window, then
c)
Enter the Y value in the Area Top entry window.
d)
Move the cursor to the lower right-hand corner or the area of interest, in the selected
Phantom camera's Preview Panel, and note the XY: value in the Preview Panel Status
Bar.
e)
Enter the X value in the Area Right entry window, then
f)
Enter the Y value in the Area Bottom entry window.
2)
Dragging a box around the Image-Based Auto-Trigger Area.
a)
Place the cursor over the image, to the upper left-hand corner or the Area, in the selected
Phantom camera's Preview Panel.
b)
Hold down the left mouse key, then
c)
Drag the cursor to the lower right-hand corner or the Area, in the selected Phantom
camera's Preview Panel, then
d)
Release the mouse key.
e)
Select the Auto Trigger option when the pop-up dialogue window displays.
RESULT: The Area values will automatically be entered in the Top, Left, Right, and Bottom entry
windows. If the Show On Image option is enabled, (checked), a yellow, ImageTrig rectangle will be
displayed, over the image in the selected Phantom camera's Preview Panel. This rectangle will not be
recorded with the image data.
3)
Click on the Full button to select the entire image area.