
User manual


Phantom Camera Control Application - Help 203
© 2010 Vision Research - An AMETEK Company
4.2.5.6 Define the Image Content Trigger (Image-Based Auto-Trigger)
This topic describes the Step-by-Step procedure to define the use of the Image-Based Auto-Trigger
feature via the Image-Based Auto-Trigger selector.
WARNING:
The Image-Based Auto-Trigger feature should never be used in applications where missed or
false triggers cannot be tolerated or where a false trigger could cause harm to people or
property.
The hardware signaling available in some Image-Based Auto-Trigger modes should be used
only to synchronize multiple Phantom cameras together and should never be used to trigger or
control any other external device or event.
CONSEQUENCES RESULTING FROM SYSTEM FAILURE, FALSE TRIGGERING OR MISUSE OF
THIS FEATURE ARE THE SOLE RESPONSIBILITY OF THE USER.
The feature allows the end-user to trigger the camera from the motion detected in the live image. The
camera may also provide an external trigger signal based on the Image-Based Auto-Trigger to be
used for synchronizing multiple Phantom cameras. The defined pixel area should be the area of the
image changes are analyzed to auto-trigger the camera.
For a brief explanation of Image-Based Auto-Trigger, see: Functional Descriptions>Image-Based
Auto-Trigger.
STEP-BY-STEP PROCEDURE
NOTE
The Image-Based Auto-Trigger feature should never be enabled while performing CSR,
(Current Session Reference), or Black Reference calibration adjustment.
1.
Click the Live Control Panel Tab.
2.
Click on the Image-Based Auto-Trigger Selector and define the Image-Based Auto-Trigger
parameters:
a.
Enable, (check), Image-Based Auto-Trigger.
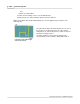
RESULT: The remaining Image-Based Auto-Trigger parameter fields become active. If the "Show On
Image" option is enable, (checked), a yellow, ImageTrig rectangle will be displayed, over the image in
the selected Phantom camera's Preview Panel. This rectangle will not be recorded with the image
data.
b.
If external control of the auto-trigger is desired, for instance, it is required that the auto-trigger
feature is disabled for some known transient event, and the auto-trigger signal from the camera
is to be routed through some external device and back into the trigger input of the camera,
enable, (check), the Only Output Signal (don't trigger this camera) option.
c.
Define the following Sensitivity parameters, including:
1)
Threshold
The Threshold specifies the amount a pixel value must change in order to be counted as an
active pixel for auto-trigger purposes. A value of 100 would require a change of
approximately half of the full swing of the camera. A typical threshold setting would be 10.
a)
Click the up/down arrows to the right of the Threshold entry window to specify the
Threshold value, alternatively