
User manual


Phantom Camera Control Application - Help 201
© 2010 Vision Research - An AMETEK Company
4.2.5.5 Define the Frame Rate Profile
This topic describes the Step-by-Step procedure to define the use of the Frame Rate Profile feature
via the Frame Rate Profile selector.
This Frame Rate Profile feature allows the end-user to define up to 5 different frame rates that
automatically change, at specified points, during the capturing process of post trigger frames. The first
profile is the profile defined under Live Control Panel>Cine Settings Selector. The remaining four
profiles will be applied to Post Trigger frames only.
NOTE
This Frame Rate Profile feature is not available with all Phantom cameras, and the actual frame
rate changes will only be applied to Post Trigger frames.
STEP-BY-STEP PROCEDURE
1.
Click the Live Control Panel Tab.
2.
Click on the Cine Setting selector.
a.
Set the Sample Rate to the fastest sample rate, (frame rate), the Frame Rate Profile feature
will record at.
b.
Select the desired Exposure Time at the fastest Sample Rate, then
c.
Specify the number of Post Trigger frames.
d.
Set the Sample Rate to the initial recording speed.
e.
Take note of the Duration time.
3.
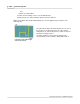
Click on the Frame Rate Profile Selector and define the Frame Rate Profile parameters:
1)
Enter the number of Partitions, or number of profiles to be used during the capture process.
RESULT: A uniform distribution of the profile partitions, (in image count), will be generated.
2)
Select the desired header variable used to define the profile(s) by clicking on the down-arrow
to display a pull-down selection list including the following options:
a)
Image # - specifies the first post trigger frame, or image number, the profile will change at.
b)
Time (s) - specifies the absolute time from the moment a trigger signal is detected.
c)
Image % - specifies a percentage of the image number from the number of post trigger
frames.
d)
Time % - specifies a percentage of time from the post trigger duration.
NOTE
If the header variable is changed for the first column, the remaining values will be updated
according to selected variable. Small changes can occur, because of a rounding process, when
switching from, then back to Image #.
If the exposure you set is greater that the maximum available value for any of the frame rate
values in the Frame Rate Profile, the program will automatically reduce that frame rate to a
compatible level.
3)
Place the cursor into the first field to be edited and define the:
a)
Desired Image or Time variables the Rate, (Frame Rate/Sample Rate), is to change at,