
User manual


Phantom Camera Control Application - Help 147
© 2010 Vision Research - An AMETEK Company
b)
Click the Open button.
RESULT: The full file path of the file is displayed next to the Firmware.. button.
3)
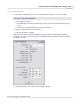
Click the FPGA.. button.
a)
Navigate to the directory, (folder), containing the ph.bin file, in the New Camera FPGA
window, then
b)
Click the Open button.
RESULT: The full file path of the file is displayed next to the FPGA.. button.
4)
Click the Flash FPGA.. button.
a)
Navigate to the directory, (folder), containing the phflash file, In the New Camera FPGA
window, then
b)
Click the Open button.
RESULT: The full file path of the file is displayed next to the Flash FPGA.. button.
5)
Click the Cinemag.. button.
a)
Navigate to the directory, (folder), containing the file, in the New Camera Cinemag
Firmware window, then
b)
Click the Open button.
RESULT: The full file path of the file is displayed next to the Cinemag.. button.
6)
Click the Kernel.. button.
a)
Navigate to the directory, (folder), containing the file, in the New Camera Kernel window,
then
b)
Click the Open button.
RESULT: The full file path of the file is displayed next to the Kernel.. button.
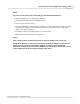
d.
Click the Upload button.
e.
Click the OK button in the "Camera RAM cines will be deleted" warning message window.
f.
Click the OK button in the "Proceed with uploading..." message window.
RESULT: The system will display a series of information windows indicating:
· Files are being uploaded.
· Wait for camera to re-boot and press OK .
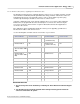
g.
In the Phantom Nucleus window, click the:
1)
Refresh button to verify changes, (refer to the Camera Info fields).
2)
Click the Close.. button.
h.
Click the Close button, and restart the Phantom Camera Control application.