
User manual


Phantom Help File144
© 2010 Vision Research - An AMETEK Company
4.2.1.3 Tools Menu Procedures
This topic describes the Step-by-Step procedures that can be performed via the Tool pull-down menu.
4.2.1.3.1 Tools - Image Processing Adjustment Procedures
The Tools feature provides several image processing techniques that can be applied to single images
or to an entire recorded cine file. These effects may be used alone or in combinations to bring out
hidden features and details. The Tools command can be used to:
· Display the image Histogram.
· Perform image processing adjustments.
· Apply various image processing effects.
The type of effects available will be depended upon the type of camera the cine file or image data was
recorded from, (i.e., color or monochrome, 8-, 10-, 12-, 14-bit pixel image bit depth, etc.).
NOTE
Not all image processing techniques are appropriate for every image. Vision Research
recommends the end-user experiment with the image processing effects to find the best
enhancements for their needs.
CAUTION
When using a monitor to apply Image Processing effects, the White Balance control, and all
brightness, contrast, gamma, and color adjustments should be changed only when using a
monitor that is in correct adjustment. Occasionally, an operator will over adjust monitor
settings in extreme lighting conditions, such as in direct sunlight, in an attempt to get a better
look at what he is trying to image. "Correcting" the appearance of images on a poorly adjusted
monitor will have a negative result on cine file recordings that will later be viewed on a properly
adjusted monitor under normal conditions.
STEP-BY-STEP PROCEDURES
1.
Select the Phantom camera or cine file the imaging tools are to used with by:
a.
Click on the Preview Panel of the camera, or Playback Panel of the cine file.
b.
Click the Manager tab to open the Manager Control Panel, and
c.
Click on the camera or cine file from their respective group tree.
2.
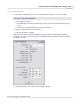
Click on the Tools Menu option, and
3.
Select the Image Tools command.
4.
Apply the desired image processing effect(s) or filter.
For a brief description of the supported image processing effects and filters, see; Functional
Descriptions>Image Processing Effects and Filters.