
User manual


Phantom Help File130
© 2010 Vision Research - An AMETEK Company
Image File in Unique Folders
To automatically name a new and unique folder, and sequentially number the individual image files
that will be stored inside them:
8.
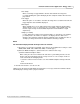
In the Save Cine dialogue window:
a.
Enter the path location followed by the @ (at) sign and single digit number\root filename
followed by the + (plus) sign and single digit number in the File Name entry field.
The single digit number specifies the number of digit places appended to the directories and
images.
For example, C:\Phantom\Images\foldername@2\rootfilename+4.DPX
· C:\Phantom\Images is the path location.
· foldername@2 specifies the directory names the image files will be placed into.
· rootname+4 is the name of the image files that will be created.
b.
Click the down-arrow to the right of the Save as type field, then
c.
Select the image file desired format from the Save as Type pull-down selection list.
d.
Check “No Range (full cine always)” if you want to save full cines or set the First image and
Image count values to set a save range. If you leave these values as they are, the save range
will be the one defined by editing each cine (set Mark In and Mark Out in Play Panel)..
e.
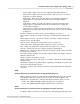
Define the Advance Options
The Phantom Camera Control application allows the user to choose one of five color
interpolation algorithms, (Best, Good, Medium, Fast, Fastest), that will be applied during the
Save Cine.. process if the file format you selected is an interpolated one, that means other
than raw.
1)
Click the Advanced Options button, then
2)
Select the desired Color Interpolation Algorithm.
NOTE
Once you selected a color interpolation algorithm and saved cine file in a non-raw,
interpolated format you cannot apply another algorithm on the same saved cine by saving it
again. In this case, the algorithm's options will be ignored.
f.
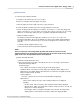
Define desired Border Data
1)
Click the Border Data button, then
2)
Select the information you want to be added to the cine or to the image, specified in the
Border data dialogue window:
a)
Outside Image:
None - When selected the user may specify the Inside Image options.
Standard - When selected the user may define the following Common Options, and
Optional Lines, that will be displayed just below the recorded cine, along with any Inside
Image information fields specified:
Common Options:
Font Size - Specifies the font size the information will be displayed at.