
User`s guide


69
Besides strain gauge and the cans, material needed for attaching the gauge to a surface include:
sand paper, degreaser/alcohol, conditioner, neutralizer solutions, cotton balls & swabs, one-side sticky
tape , adhesive , low-impedance strain gage wire (about 15 “) , and soldering material. The steps of are
explained below.
1) Degreasing: wipe the surface with degreaser or alcohol to remove oil, grease, organic taminants
and soluble chemical residues.
2) Surface abrading: sand the surface with sand paper, in order to remove loosely bonded adherents
(scalc, rust, paint, coating, oxides, etc.) and develop a surface texture suitable for bonding.
3) Mark layout lines: mark the planned positions to attach strain gauges.
4) Apply neutralizer to the surface, alcohol works as well.
5) Mount on tape: secure strain gauge to the surface with tape, before applying adhesive. When
mounting the gauge to the tape, make sure that the side of the gage with soldering terminals
should be facing the tape, or “facing up” from the surface.
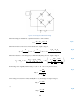
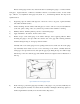
Carefully remove the strain gauge from its package with tweezers, make sure the strain gauge
stay chemically clean. Attach one end of a 4-to-6 inch tape to the surface, carefully attach the
strain gage to the tape with tweezers, then pick the gage up by lifting the tape at a shallow angle
until the tape comes free with the gage and terminal attached. See figure below for illustration of
this step.
Figure 20 Mount the strain gauge on tape
6) Position the tape: position the gauge/tape assembly so the gauge is over previously marked layout
line. Gently apply the assembly onto surface. If the assembly is misaligned, lift the tape again at a
shallow angle until the assembly is free from the surface. Reposition.