
User`s guide

122
3.2.3 Verify the Set-up
Before starting the measurements, the strain gauge installations needs to be verified, the following steps
should be followed:
e. Run the VI program to monitor the readings.
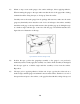
f. Check for irrelevant induced voltages in the circuit by reading the voltage when the power supply
to the bridge is disconnected. Ensure that bridge output voltage readings for each strain-gage
channel are practically zero.
g. Connect the excitation power supply to the bridge and verify both the correct voltage level and its
stability.
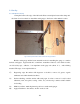
h. Test out the strain gage bond by applying pressure to the gage. The reading should not be affected.
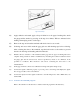
i. Observe corresponding change in the time domain graph as the beam is gently bent.
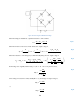
j. Take a weight provided by the lab and attach it to the beam, record a few seconds of
voltage readings after the system stabilizes. Take an average of the stabilized data and
calculate the corresponding measured strain. Calculate the theoretical strain at the point
of the stain gauge and compare with the measurement result.
3.3 Taking Measurements
Set the sampling rate to over 1kHz. Pluck the beam a few times and record the data with
provided program. Note that the program only records last group of data before clicking “stop”
button to end the program. The length of the recorded data is the number of samples divided by
sampling rate.