
User`s guide


119
3.2 Set-Up
3.2.1 Hardware Set-up
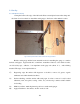
Clamp the beam to the edge of the lab bench. Place a metal plate between the clamp and
the beam for noise reduction. Attach the strain gauge to the beam on the marked location.
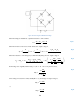
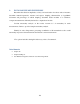
Figure 35 Clamped Cantilever Beam with Strain Gauge Installed
Besides strain gauge and the beam, material needed for attaching the gauge to a surface
include: sand paper, degreaser/alcohol, conditioner, neutralizer solutions, cotton balls & swabs,
one-side sticky tape , adhesive , low-impedance strain gage wire (about 15 “) , and soldering
material. The steps of are explained below.
17) Degreasing: wipe the surface with degreaser or alcohol to remove oil, grease, organic
taminants and soluble chemical residues.
18) Surface abrading: sand the surface with sand paper, in order to remove loosely bonded
adherents (scalc, rust, paint, coating, oxides, etc.) and develop a surface texture suitable
for bonding.
19) Mark layout lines: mark the planned positions to attach strain gauges.
20) Apply neutralizer to the surface, alcohol works as well.