Model NO.: VP-9258V Portable 3.5 in. External Enclosure Installation Guide ViPowER www.vipower.
Table of Contents Introduction ..................................................................... 1 Features ............................................................................. 1 Alternative Smart connections................................................ 3 Electrical safety for users .................................................... 3 Operating systems .............................................................. 4 Certificate of Compliance ................................................
Introduction Congratulation on your purchase of VP-9258V USB 2.0 Portable 3.5 in. External Enclosure. This External Enclosure has been designed to provide portable hot-swapping (Plug and Play) operation of internal 3.5 in. hard drives. Supplied with this enclosure is a USB 2.0 smart cable, AC/DC adapter, stand for enclosure and a CD containing installation driver(s). The CD also contains a copy of this installation guide. The USB 2.
• supports HDD, MO, CR-ROM, CD-RW, DVD and DVD-RAM. • hot swapping (plug and play). Support USB 2.0 transfer rates of 12 Mbps and 480 Mbps. • high speed (480 Mbit) and full speed (12 Mbit) support. • integrated USB transceiver. • USB suspend/resume remote wake up support Power modes. • self powered (+ 5V). Supports ATA P10 modes 0-4. • ATA interface operation mode automatically selected during device initialisation or manually programmed with configuration data Support UDMA modes 0-4 of operation. USB 2.
Alternative Smart connections Your VP-9258V is supplied with the VP-9208 USB2.0 smart cable. You can change connectivity by simply changing your smart cable! Options are: Alternative connections: • VP-9001 SATA (Serial ATA) to IDE 36 pin connector. • VP-9006 PCMCIA to IDE 36 pin connector. • VP-9007 Card Bus to IDE 36 pin connector. • VP-9008 USB 1.1 to IDE 36 pin connector. • VP-9009 Firewire 1394 to IDE 36 pin connector. • VP-9208* USB 2.0 to IDE 36 pin connector.
Operating systems Microsoft XP Download Service Pack 1 from Microsoft (free download) this ensures your copy of XP has the latest drivers and improves recognition of external device and smart cable. Your VP-9258V will be automatically recognized and accessible. Windows 2000 You need to load the smart cable driver from the CD supplied. Following loading of this driver your external HDD (device) will be automatically recognized and accessible.
Certificate of Compliance VP-9258V Installation Guide 5
6 VP-9258V Installation Guide
Installation Prior to installation The VP-9258V USB 2.0 Portable 3.5 in. External Enclosure is supplied with all the necessary items to enable successful installation. Prior to commencing installation please check to ensure that the following parts are included. In the unlikely event of any parts being damaged, or missing, please contact your supplier or email support@vipower.com.tw. Do not attempt to install this device with parts other than those recommended by Vipower.
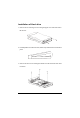
Installation of Hard drive 1. Remove the two retaining screws securing the upper case of the Enclosure to the rear face. 2. Carefully lift the rear of the case. Then, slide it away from the rear face of the front panel. 3. Remove the four screws retaining the hard drive cradle to the base unit of the Enclosure.
4. Lift out the cradle. 5. Position the hard drive into the cradle. 6. Secure the hard drive into the cradle using the four retaining screws.
7. Locate the IDE port and power port situated on the rear face of the hard drive. Plug the IDE cable and power cable into the appropriate port ensuring that they fit securely. IDE PORT POWER PORT RED LINE Line List Line colour IDE CABLE Role 1 2 Yellow Black +12V Earth 3 Black Earth 4 Red +5V 4321 POWER CABLE 8. Position the cradle/hard drive onto the Enclosure base unit. 9. Secure the cradle with the four retaining screws.
10. Replace the upper case. Note Ensure that the groove in the upper case aligns with the slot in the base unit. 11. Slide the upper case forward ensuring that it abuts the rear face of the front panel. 12. Finally, secure the upper case with the two retaining screws.
Installing the USB software Prior to connecting your External Enclosure it is necessary to first install the USB driver applicable to your system. To install the driver use the following procedure. 1. Insert the CD supplied with this package into your computer. 2. Select the appropriate driver (i.e. driver for PC/Notebook or Mac). 3. Install the driver software by following the on screen instructions.
assistance. (b) If your Operating system is Windows NT, 95 or Mac OS 9.0 or lower, the drive is not compatible and will not be detected. Connecting External Enclosure to your PC/ Notebook or Mac Prior to connecting your External Enclosure to your PC/Notebook or Mac ensure that your USB 2.0 Host Card Hardware (inside your computer) and driver software are correctly installed. This is essential to ensure USB 2.0 performance. 1. Ensure that your computer and any auxiliary devices are switched off. 2.
2. Once the smart cable is connected the Enclosure will automatically be de tected by the system. Click Next. 3. A window will be displayed indicating, "Search for best driver for your device". Click Next.
4. The next window requests a search for new drivers. Ensure that "Specify a location is selected. Click Next. Note x:\ means user disc code. The specified location will depend upon user's CD-ROM drive code. 5. This window indicates that Windows is ready to install the best driver for the device. Click Next.
6. The final window informs you that Windows has completed the installation. Click Finish. 7. On completion of the installation an icon will appear in the right-hand side of the My Computer window indicating that USB 2.0 has successfully con nected to your computer.
Trouble shooting- Frequently asked questions (VP2528V,VP9258V, VP6228V) Question There is no power to the Enclosure. Answer Check to ensure all AC power adapter connections are fitted firmly (power cable and converter cable). Check fuse in 3-pin plug (ensure you only replace with correctly rated fuse). Question My system does not recognise the external HDD. Answer Check Operating System and ensure latest service pack(s) are in use. Check drivers are loaded (if using 98SE and ME).
(2) If you do not have an Anti virus programme running try the following procedure. Copy the contents of the CD writer onto the hard drive and then run the installation from the hard drive. Question Why is my CD-RW or CD-ROM drive not being recognized by Sony Hot Burn Answer This happens most frequently with an ATAPI(IDE) CD-ROM drive. This can be caused when the IDE Bus master drivers need to be updated.
and may accidentally cause this issue. Make sure the drive is powered on. (4) Ensure that the drive is not connected to a USB Hub and is connected directly to the computer. (5) Ensure that the USB cable does not have any bent pins or broken connectors. (6) The cable for the CD actually houses the firmware of the USB bridge. If this cable is not connected or seated firmly, the drive may not be detected; however the Shuttle Technologies USB entries will be present in the Device Manager.
Question Why is my drive detected as an "Unknown Device" in Windows? Answer We have discovered that many times this is caused by "Ghost Drives" in the operating system. When hardware (and some software) is installed and then removed the system does not remove all of the drivers and references to the old drive. This causes problems installing new devices. This problem can be fixed by booting into safe mode and removing references from Device Manager to drives not on your system.
Question I am trying to connect my CD writer to my computer running Windows 98SE but I cannot get the drivers to load. When I browse the CD to locate the drivers the disc does not show any files. Answer You will need to type in the path of the drivers. Click on Start>>Run>>Type in D:\English\USB (D: is normally the drive letter of your CD-ROM. You will need to know the drive letter of your CD-ROM to get the correct path). Another fix for this issue is Right Click the Start button>>choose Explorer.
Printed on recycled paper.