
User Manual


English
25
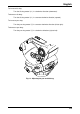
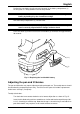
Position the new battery (positive terminal upward) in the battery compartment (1),
ensuring that it is neatly stowed in the cut-out provided.
Refit the battery compartment (1) into the head.
Press the switch (8) and ensure that the level bubble (9) illuminates for approximately
20 seconds.
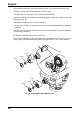
Adjusting the pan and tilt brakes
The pan and tilt brakes may require adjustment after prolonged use. These adjustments should
be carried out by competent persons only. The field service spares kit includes replacement
brake levers and caps (if required).
To adjust the brakes:
Turn the brake lever counter-clockwise to its lowest off position as shown in Fig. 15.
Insert the thin-blade of a precision screwdriver or similar tool into the top of the cap (10.1
& 12.1). Carefully prise off the cap. Note that the cap is secured using a small adhesive
pad and therefore may require a small amount of force to remove.
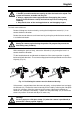
CAUTION! Use plastic tweezers when handling the battery. Avoid shortening the
battery by holding it by the circumference edge.
CAUTION! DO NOT use force on the battery compartment. Ensure that the compart-
ment is correctly aligned with the fittings inside the head.
Fig. 14 Replacing the level bubble battery
(1)
(1.1)