ACTIVE HUMIDITY INSTALLATION GUIDE The Coolest Thing In Wine Storage www.whisperkool.
Copyright © 2012. WhisperKOOL. All rights reserved. This manual, the product design, and the design concepts are copyrighted by WhisperKOOL, with all rights reserved. Your rights with regard to the hardware and manual are subject to the restrictions and limitations imposed by the copyright laws of the United States of America.
ACTIVE HUMIDITY OPTION OVERVIEW ACTIVE HUMIDITY SPECIFICATIONS Power Consumption 0.2 amps @ 120V/60 Hz dBA TBD 30-90% RH Humidistat Range ± 1% Humidistat Accuracy Humidistat Adjustment Increments 1% Water Supply Feed Rate 0.63 gph @ 40 psi Use of the Active Humidity Option Humidity may fluctuate in the wine cellar. The Active Humidity Option stabilizes the environment by adding moisture when the wine cellar is becoming dry.
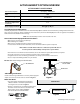
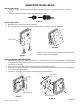
HUMIDISTAT INSTALLATION Removing the Cover 1. Plug the circular connector from the humidistat cable into the circular connector on the unit as shown in Figure 4. 2. Route the wire from the unit to the desired humidistat location. Figure 4 Removing the Cover 1. Move both slide controls to the bottom position. 2. Use a screwdriver to loosen the screws at the bottom of the humidistat as shown in Figure 5. Slide controls Figure 6 3.
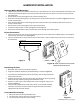
HUMIDISTAT INSTALLATION Mounting With a Wall Mount Plate 1. Make sure the power to humidistat electrical wires is shut off at the main electrical box before installing the unit. 2. Position the wall mount plate on the wall or junction box and ensure the plate is level and covers the junction box completely. 3. Pull the electrical wires through the hole in the wall mount plate. 4.
WhisperKOOL 1738 E. Alpine Ave Stockton, CA 95205 1(800) 343-9463 www.whisperkool.