
Use and Care Manual

- 16 -
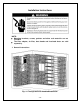
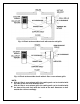
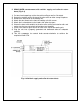
Fig. 4.5 Flush to the outside of wall with hot-air exhaust duct & air filter
NOTES:
The cooling unit can be installed with the front of the unit flush with the
racks.
The cooling unit can be installed with the front of the unit flush with the
inside of the wall. Construct a shelf outside the cellar accordingly.
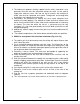
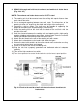
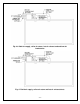
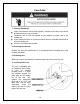
4. WM-4510 remote-mount with cold-air supply, cellar-air return, hot-air
exhaust and ambient-air intake ducts (Fig. 4.6 & 4.7)
NOTES:
The supply and return ducts can be 50 FT in total.
The exhaust and intake ducts can be 50 FT in total.
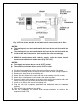
1) Cut two circular openings at the wine cellar ceiling or wall as illustrated.
2) Secure the cooling unit on the top of the wine cellar or other strong flat places
3) Remove the front cover of the cooling unit.
4) Attach the duct hoods to the front and rear of the cooling unit with screws.
5) Attach the insulated ducts to the hoods with adhesive tapes.
6) Secure the ducts with conduits to the wine cellar ceiling and exterior walls and
make sure they are not curled, twisted, bent and clogged.
7) Install an air filter at the rear of the cooling unit.
8) Plug the unit into a properly grounded and dedicated outlet of adequate
capacity.
9) Turn on the high condenser fan switch.
10) Turn the evaporator fan control knob counter-clockwise to achieve the
required air flow CFM.