
Use and Care Manual

- 15 -
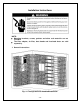
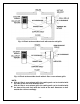
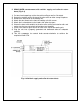
3. WM-4510 through-wall with hot-air exhaust and ambient-air intake ducts
(Fig. 4.4 & 4.5)
NOTE: The exhaust and intake ducts can be 50 FT in total.
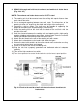
1) The cooling unit shall be mounted near the ceiling with equal distance from
each side of the cellar.
2) Cut a rectangular opening between two wall studs. The dimensions of the
opening shall be 1/4” larger than the width and height of the cooling unit.
3) Construct a shelf as shown. The shelf must be capable of supporting the
weight of the cooling unit and preventing it from moving.
4) Place the cooling unit on the shelf with the back of the unit flush with the
outside of the wall.
5) Seal the clearance between the cooling unit and opening with a high quality
weather stripping, polyurethane spray foam, or foam tape. Cover the seal with
molding and attach the molding to the wall not the unit.
6) Attach the duct hoods to the rear of the cooling unit with screws.
7) Attach the insulated ducts to the hoods with adhesive tapes.
8) Secure the ducts with conduits to the cellar exterior walls and make sure they
are not curled, twisted, bent and clogged.
9) Install an air filter at the rear of the cooling unit.
10) Plug the unit into a properly grounded and dedicated outlet of adequate
capacity.
11) Turn on the high condenser fan switch.
12) Turn the evaporator fan control knob clockwise to the lowest speed position.
Fig. 4.4 Flush to the outside of wall with hot-air exhaust & ambient-air
intake ducts