
Product manual
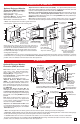


A. Accessing the Touch Tone Programming Mode
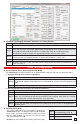
Touch Tone Programming
1. Using the Security Code to Enter Programming
Step 1. From a touch tone phone call the 1600-IP Series phone you would like to program.
Step 2.
When the 1600-IP Series phone answers, enter the 6-digit security code (factory set to 845464,
see section B). A double beep should then be heard indicating you have entered the programming
mode.
Step 3. You can now touch tone program the Quick Programming Features listed on page 10.
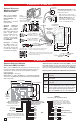
2. Manually Resetting the Security Code to Enter Programming
Step 1. Power down the 1600-IP Series phone by disconnecting the RJ45 plug.
Step 2. Press and hold the HELP/CALL button, then reconnect the RJ45.
Step 3.
Continue to hold the button until you hear 2 beeps, (approximately 6 seconds). Then release the
button. The “Call Connected” LED will remain off for the first 3 seconds, flash slowly for 3 seconds
then fast flash (after 2 beeps) indicating when to release button.
Step 4. The security code is now reset to 845464 (factory default).
Step 5.
You can now enter touch tone programming by following the steps in section 1. Using the Secu-
rity Code, above.
The 1600-IP Series emergency phones can be programmed by calling the unit from any touch tone phone.
Step 1
Access programming as shown
in Programming section A.
Step 2 Enter 123456 #19.
Step 3 Hang-up.
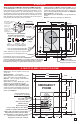
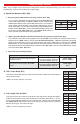
B. Security Code (#19)
The security code allows the user/installer to program the
1600-IP Series phone. The factory set security code is 845464
(V-I-K-I-N-G). It is recommended that the factory set security
code be changed. Note: The security code must be 6 digits
and cannot include a
Q
or a #.
Example: To store 123456 as the security code (shown right).
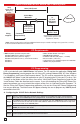
Step 1. Power down the 1600-IP Series phone by disconnecting the RJ45 plug.
Step 2. Press and hold the HELP/CALL button, then reconnect the RJ45.
Step 3.
Continue to hold the button until you hear 2 beeps, (approximately 6 seconds). Continue to hold the
button until you hear 4 more beeps, approximately 6 seconds later, then release the button. The “Call
Connected” LED will remain off for the first 3 seconds, flash slowly for 3 seconds (2 beeps),
fast flash for 6 seconds (4 beeps), then light steady indicating when to release button.
Step 4.
The unit should continue to output double beeps and slowly flash the LED indicating all Network Pa-
rameters are now reset to factory default.
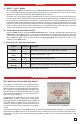
The default static IP Address is: 192.168.154.1
Step 5. You must now power cycle the unit by momentarily disconnecting the RJ45.
Step 6.
You will be required to re-enter your initial network settings prior to any touch tone programming, see
section A on page 9.
B. Manually Resetting All Network Parameters to Factory Default
11