
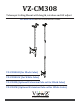
Installation Instructions


6 Installation InstructionsVisit the ViewZ USA website at http://www.viewzusa.com
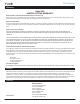
CM 308 series
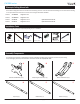
Securing Mount to Building
Secure Mounting to Brick/Concrete or Wood
Installation
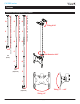
1) Mount Wall/Ceiling mount bracket (B) with screw & washers (U)
2) Tighten the M12 (V) lock nut using a open-wrench
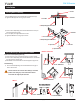
Brick or Concrete Wall/Ceiling Mounting
1) Insert anchors to truss or channel strut (brick, concrete or wood)
2) Insert screw to Wall/Ceiling mount bracket with wahsers rod between
truss gap or hole in channel strut.
3) Place washer over the threaded rod and then tighten using wrench.
Wood Mounting
1) Insert screw to Wall/Ceiling mount bracket between truss gap or
hole in channel strut.
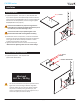
Caution: Please be extra cautious when finding a mountable
position in the ceiling. Dry-wall or weak-wood material
cannot bear the weight of pole & monitor.
P Lock Nut
N Screws & Washers
N Washers
B Wall/Ceiling Mount Bracket
B Wall/Ceiling Mount Bracket
D Top Pole
Q Open Wrench
T Anchors
S Screws & Washers
S Screws & Washers
Truss / Channel Struct
Brick or Concrete
Wood
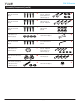
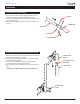
3) Insert screw to Wall/Ceiling mount bracket with wahsers when you
setup the position of top pole.
4) You can adjust pole angle between 0⁰ and 90⁰.
5) Tighten the M8 lock nut using a open-wrench.
V Lock Nut
V Lock Nut
V Lock Nut
U Screws
U Washers
U Screws & Washers
U Screws & Washers