ViewSonic ViewSonic ®® Digital Photo Photo Frame Frame Digital DPX802 DPX702 -- Quick Quick Start StartGuide Guide - Guide de démarrage rapide - Guía de Inicio Rápido Model Model No. No.
Compliance Information FCC Statement English This device complies with part 15 of FCC Rules. Operation is subject to the following two conditions: (1) this device may not cause harmful interference, and (2) this device must accept any interference received, including interference that may cause undesired operation. This equipment has been tested and found to comply with the limits for a Class B digital device, pursuant to part 15 of the FCC Rules.
Important Safety Instructions Read these instructions. 2. Keep these instructions. 3. Heed all warnings. 4. Follow all instructions. 5. Do not use this unit near water. English 1. 6. Clean with a soft, dry cloth. If still not clean, see “Cleaning the Display” in this guide for further instructions. 7. o not block any ventilation openings. Install the unit in accordance with the D manufacturer’s instructions. 8.
Declaration of RoHS Compliance English This product has been designed and manufactured in compliance with Directive 2002/95/EC of the European Parliament and the Council on restriction of the use of certain hazardous substances in electrical and electronic equipment (RoHS Directive) and is deemed to comply with the maximum concentration values issued by the European Technical Adaptation Committee (TAC) as shown below: Proposed Maximum Concentration Actual Concentration Lead (Pb) 0.1% < 0.
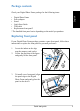
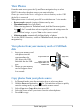
Package contents English Check your Digital Photo Frame package for the following items. • Digital Photo Frame • Power adapter • Stand • Quick Start Guide • USB cable • Replacement front panel* * The bundled front panel varies depending on the model you purchase. Replacing front panel If your Digital Photo Frame package contains a spare front panel, follow these instructions to replace the front panel for personal preference. 1. 2. 3. Locate the indent on the edge near the memory card socket.
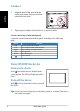
Connect Align the head of the stand with the socket, then rotate clockwise until the stand locks into place. 2. Plug the power adapter from the device to a power outlet. English 1. Locate control keys (in the back panel) Locate the control buttons in the back panel according to the following table.
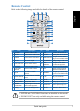
Remote Control Refer to the following image and table for details of the remote control. 2 3 4 26 5 25 6 7 8 24 23 English 1 22 9 21 10 20 19 11 12 View 13 18 Setting No. Item 1 POWER 2 MUSIC 17 14 16 15 Description No.
Settings Brightness Allows you to adjust the screen brightness. English Language Allows you to select the language you need. Default Go to SETTINGS > Default, then select Yes to retore to the factory default setting or No to discard the selection. Set Beep Allows you to turn on/off the key control sound. Status Displays the software version and the current memory size. Auto Tilt Automatically adjusts the orientation of the screen when you rotate the frame. The default value is On.
View Photos English From the main screen, press the Up and Down navigation keys to select PHOTO, then select the photo source you want to display. Photos pre-stored in the device will appear when no memory card or USB flash disk is connected.
Copy multi-photos 1. English 2. 3. In Thumnail mode, select one photo, then press the Down navigation key . The selected photo is labeled with a "+" mark. Repeat step 1 to other photos you want to copy to a source. Finishing selection, repeat step 2–5 in section Copy photos from your photo source. Delete photos from your photo source 1. 2. 3. In Thumnail mode, press the navigation keys to select one photo.
Supported format Quick start guide English JPEG: JPEG Baseline (4:4:4/4:2:2/4:2:0, support up to 8000x8000 pixels), Progressive JPEG (Support up to 1024x1024 pixels) BMP: MS Windows V3.1/4/8/16/24 uncompressed Bitmap. (Support up to 1024x1024 pixels) The system allows you to display 4000 photos at most from your own memory card or USB flash disk.
View Video English From the main screen, press the navigation keys to select VIDEO, then select the video source you want to play. Videos pre-stored in the device will appear when no memory card or USB flash disk is connected. 1. Insert your memory card containing video into the corresponding slot, or insert your USB flash disk into the USB port. Videos on your memory card will appear after a few seconds. See page 9 for memory card and USB port locations. 2.
Copy multi-video 2. 3. Select one video, then press the Right navigation key. The selected video is labeled with a "+" mark. Repeat step 1 for the other videos you want to copy to a source. Finishing selection, repeat step 2–5 in section Copy videos from your video source. English 1. Delete video from your video source 1. 2. 3. Press the navigation keys to select one video. Press View on the remote control or hold the Right navigation key for two seconds to enter the video settings menu.
Play Audio English From the main screen, press the navigation keys to select AUDIO, then select the audio source you want to play. Audio pre-stored in the device will appear when no memory card or USB flash disk is connected. 1. Insert your memory card containing audio into the corresponding slot, or insert your USB flash disk into the USB port. Audio on your memory card will appear after a few seconds. See page 9 for memory card and USB port locations. 2.
Copy multi-audio 2. 3. Select one audio, then press the Right navigation key. The selected audio is labeled with a "+" mark. Repeat step 1 for the other audio you want to copy to a source. Finishing selection, repeat step 2–5 in section Copy audio from your audio source. English 1. Delete audio from your audio source 1. 2. 3. Press the navigation keys to select one audio. Press View on the remote control or hold the Right navigation key for two seconds to enter the audio settings menu.
Customer Support For technical support or product service, see the table below or contact your reseller. English Note : You will need the product serial number. Country/Region Web Site T=Telephone F=Fax E-mail Australia/New Zealand www.viewsonic.com.au AUS=1800 880 818 NZ=0800 008 822 service@au.viewsonic.com Canada www.viewsonic.com T (Toll-Free)= 1-866-463-4775 T (Toll)= 1-424-233-2533 F= 1-909-468-1202 service.ca@viewsonic.com Europe/Middle East/ Baltic countries/North Africa www.