ViewSonic Cine5000 DLP Projector ® - User Guide - Guide de l’utilisateur - Bedienungsanleitung - Guía del usuario - Guida dell’utente - Guia do usuário - Användarhandbok - Käyttöopas - Pyководство пользователя - 使用手冊 - 使用手冊 Model No.
Compliance Information For U.S.A. This device complies with part 15 of the FCC Rules. Operation is subject to the following two conditions: (1) The device may not cause harmful interference, and (2) this device must accept any interference received, including interference that may cause undesired operation. This equipment has been tested and found to comply with the limits for a Class B digital device, pursuant to part 15 of the FCC Rules.
Important Safety Instructions 1. Read these instructions completely before using the equipment. 2. Keep these instructions in a safe place. 3. Heed all warnings. 4. Follow all instructions. 5. Do not use this equipment near water. Warning: To reduce the risk of fire or electric shock, do not expose this apparatus to rain or moisture. 6. Clean with a soft, dry cloth. If further cleaning is required, see “Cleaning the Display” in this guide for further instructions. 7.
Copyright Information Copyright © ViewSonic® Corporation, 2006. All rights reserved. Macintosh and Power Macintosh are registered trademarks of Apple Computer, Inc. Microsoft, Windows, Windows NT, and the Windows logo are registered trademarks of Microsoft Corporation in the United States and other countries. ViewSonic, the three birds’ logo, OnView, ViewMatch, and ViewMeter are registered trademarks of ViewSonic Corporation. VESA is a registered trademark of the Video Electronics Standards Association.
TABLE OF CONTENTS ENGLISH 1. Product Overview 4 1-1 Features 4 1-2 Package Contents 4 1-3 Main Unit 5 1-4 Control Panel 6 1-5 Rear Terminals 6 2.
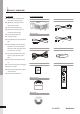
1 PRODUCT OVERVIEW 1-1.FEATURES ◆ 250 W P-VIP lamp. Life 2000hrs at Boost 1-2.PACKAGE CONTENTS ◆ Projector x 1 ◆ Power Cord (US/EU) mode, 3000hrs in Eco mode (200W). ◆ High efficiency cooling system with low system acoustic noise level. ◆ Lamp is easily replaceable by user. ◆ Manual zoom and focus lens with a 1:1.2 US zoom ratio and 100% lens offset. ◆ 33" to 255" diagonal image size. ◆ PC Audio Cable x 1 ◆ 16.7million true colors. ◆ PC compatibility: VGA / SVGA / XGA / SXGA / EU MAC.
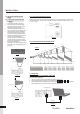
PRODUCT OVERVIEW ENGLISH 1-3.
PRODUCT OVERVIEW 1-5.REAR TERMINALS 1-4.
2 INSTALLATION ENGLISH 2-1.TURNING ON/OFF THE PROJECTOR 2-1-3.LED INDICATION STATUS 2-1-1.STARTING UP THE PROJECTOR 1. Ensure that the supplied power cord is Condition securely connected at the AC inlet of the projector (Drawing 8) and power outlet. 2. Remove the lens cap. 3. Turn on the power switch. Ensure the "Power" 1.
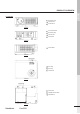
INSTALLATION 2-2.ADJUSTING THE PROJECTED IMAGE 2-2-2.ADJUSTING THE ZOOM and FOCUS 2-2-1.ADJUSTING THE PROJECTED HEIGHT Rotate the Zoom ring to adjust the image size. Rotate the Focus ring to focus the image. The projector will focus at distances from 1.5m (60in. / 5 ft.) to 10m (394 in. / 32.9 ft.). The optimum distance is from 1.5 m to 5 m (197 in. / 16.5 ft.). 1. 2. 3. 4. 5. Press the Elevator buttons.
3 CONTROL PANEL AND REMOTE CONTROL 3-1-2.USING THE REMOTE CONTROL Control functions through the Control Panel and Remote Control. 1. Power: Turns On / Off the projector. 2. Auto Source: Selects PC, HDMI, SVideo, Component-I and Video (YCbCr), Analog YPbPr, Composite 3-1-1.USING CONTROL PANEL 1. MENU: Displays the OSD. Press again to exit the OSD. 3. PC: Directly connect to PC mode. 2. ASPECT: Selects your desired aspect ratio. 4. HDMI: Directly connect to HDMI mode. 3.
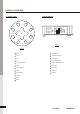
CONTROL PANEL AND REMOTE CONTROL 3-2.ON-SCREEN DISPLAY MENU 3-2-1.HOW TO OPERATE 1. Press the "Menu" button on the Remote Control or Control Panel to enter the ONScreen Display (OSD) menu. 2. 3. Image Movie: This mode is good for movie pictures. Display User: This mode allows you to adjust details of Brightness image. Press the "Right" button to enter the Image Mode Audio System Language 50 Contrast 50 Vivid Normal Movie User submenu.
CONTROL PANEL AND REMOTE CONTROL Factory Reset: Resets projector's parameters to Red, Green, Blue: Increases or decreases the the default settings. value to find the desired color temperature. Over Scan: Select your desired mode video or PC ENGLISH button to select Red, Green, or Blue adjustment. to do the over scan.
4 APPENDICES 4-1.TROUBLE SHOOTING 1. ◆ Make sure the Audio setup menu or No images appears 8. speaker setup menu in DVD player's attached and flush with the bottom of the unit. OSD is set properly. The unit will not operate with the cover ◆ Check the power cable connection at the menu is set as required. wall outlet. ◆ Confirm that the main power switch at 7. 9. Reset the lamp timer. Remote control does not work the rear of the projector is in the "on" ◆ Install new batteries. position.
4-2-2.CLEANING THE PROJECTOR 1. ◆ Cleaning the cabinet Press the Menu button on control panel or Remote Control. 2. 3. ENGLISH ◆ To reset the lamp timer Turn off projector and unplug the power cord Go into the system menu and move the from the projector before cleaning the outer cursor to the lamp reset item. cabinet. Select "Yes" to execute the lamp reset and Wipe lightly with a soft, dry cloth. If the the lamp hours will reset to 0 hour.
APPENDICES 4-3.SPECIFICATION Color system NTSC / PAL / SECAM / NTSC4.43 Computer Compatibility SXGA (Compression) / XGA / SVGA / VGA / Mac Screen Size (Diagonal) 33"-255" Throw Distance – 1.5m DMD Panel Single 0.65" DMD Number of Pixels 983,040(1280x768) Projection Lens F2.4, Zoom Ratio: 1.
Customer Support For technical support or product service, see the table below or contact your reseller. Note : You will need the product serial number. T=Telephone Country/ Region Web Site United States www.viewsonic.com/support/ Canada www.viewsonic.com/support T= 866 463 4775 service.ca@viewsonic.com United Kingdom www.viewsoniceurope.com/uk T= 0207 949 0307 service.eu@viewsoniceurope.com Europe, Middle East, Baltic countries, and North Africa www.viewsoniceurope.
Limited Warranty ViewSonic Projector ® What the warranty covers: ViewSonic warrants its products to be free from defects in material and workmanship during the warranty period. If a product proves to be defective in material or workmanship during the warranty period, ViewSonic will at its sole option repair or replace the product with a like product. Replacement product or parts may include remanufactured or refurbished parts or components.