ViewSonic ® VNB100 NetBook - User Guide - Guide de l’utilisateur - Bedienungsanleitung - Guía del usuario - Pyководство пользователя - Οδηγός χρηστών - 使用手冊(繁中) - 使用手冊 (簡中) Model No.
Compliance Information CE Conformity for European Countries The device complies with the EMC Directive 2004/108/EC and Low Voltage Directive 2006/95/EC. Following information is only for EU-member states: The mark shown to the right is in compliance with the Waste Electrical and Electronic Equipment Directive 2002/96/EC (WEEE). The mark indicates the requirement NOT to dispose the equipment as unsorted municipal waste, but use the return and collection systems according to local law.
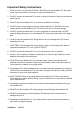
Important Safety Instructions 1. DO NOT press or touch the LCD Screen. DO NOT place the Notebook PC with small items, they may scratch LCD Screen or enter the Notebook PC. 2. DO NOT expose the Notebook PC to dirty or dusty environment. Keep the environment clean and dry. 3. DO NOT place the Notebook PC on uneven or unstable work surface. 4. DO NOT place or drop objects on the top of the Notebook PC. DO NOT shove any foreign objects into the Notebook PC. DO NOT cover the LCD Screen strongly. 5.
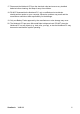
17. Disconnect the Notebook PC from the electrical outlet and remove any installed batteries before cleaning. And Keep it away from children. 18. DO NOT disassemble the Notebook PC, only a certified service technician should perform repairs on your computer. Otherwise, problem may result and the manufacturer should not hold responsibility for the damage. 19. Only use Battery Packs approved by the manufacturer or else damage may occur. 20. The Notebook PC has some little metal flake to disperse heat.
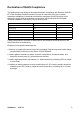
Declaration of RoHS Compliance This product has been designed and manufactured in compliance with Directive 2002/95/ EC of the European Parliament and the Council on restriction of the use of certain hazardous substances in electrical and electronic equipment (RoHS Directive) and is deemed to comply with the maximum concentration values issued by the European Technical Adaptation Committee (TAC) as shown below: Substance Proposed Maximum Concentration Actual Concentration Lead (Pb) 0,1% < 0,1% Mercury
Copyright Information Copyright © ViewSonic® Corporation, 2009. All rights reserved. Microsoft®, Windows®, Windows NT®, and the Windows® logo are registered trademarks of Microsoft® Corporation in the United States and other countries. ViewSonic®, the three birds logo, OnView®, ViewMatch™, and ViewMeter® are registered trademarks of ViewSonic® Corporation. Intel®, Pentium®, and Atom™ are registered trademarks of Intel Corporation.
Directions Meanings of icons: Forbidding: forbid improper operations to avoid damaging the Notebook PC. Caution: cautions for operators to avoid potential damages. Please note and remember. Importance: important information, common notes, definitions, general knowledge and references, etc.
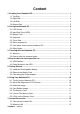
Content 1. Knowing Your Notebook PC ............................................................................. 1 1-1 Top Side........................................................................................................ 1 1-2 Right Side ..................................................................................................... 2 1-3 Left Side........................................................................................................ 2 1-4 Bottom Side ......................
8. Power Managing System................................................................................. 14 8-1 Battery System............................................................................................ 14 8-1-1 Checking Battery Power .................................................................... 14 8-1-2 Charging the Battery Pack ................................................................. 15 8-1-3 Low Power Warning................................................................
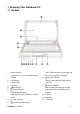
1. Knowing Your Notebook PC 1-1 Top Side 1. Built-in Camera Click Fn+NumLk to turn on the light and Click Fn+F1 to turn on or off the camera the numeric keypad is unlocked. function. 2. LCD Screen 3. Power button 4. Keyboard 10. Cap Lock Indicator Light is green when the cap keypad is unlocked. 11. Charge Indicator 5. Microphone Light is orange during being charged 6. Power Indicator and is green when the battery is fully 7. HDD Status Indicator 8. 9. charged.
1-2 Right Side 1. SD/MMC/MS Port 2. USB Port (2.0) 3. VGA Port 4. Lock Port 1-3 Left Side 1. Power Jack 2. Ethernet/LAN Port 3. USB Port (2.0) 4. Headphone Jack 5. Microphone Jack 6. Express Card Port The USB card can only be inserted in one orientation. Force to insert the card may in result of damage. 1-4 Bottom Side 1. Lithium Rechargeable Battery 2. Battery Latch 3.
2. Caring the Notebook PC The Notebook PC is a precision device; the error operation may damage the device. 2-1 LCD Screen LCD Screen is the most delicate component of the Notebook PC and comprised of thin glass. It may be broken up by external abrupt force. DO NOT scratch the cover of the Notebook PC, or the scrape on the cover cannot remove. DO NOT cover the LCD Screen strongly, or else damage may occur.
2-3 Battery Pack Please recycle the Battery Pack, and check with your Local Authority or retailer for recycling advice. DO NOT put the Battery Pack near or into the fire, or else it may cause fire or explode. The Battery Pack will short circuit if the Battery Pack is punctured or reassembled The ideal temperature range that the Battery Pack be used is between 20℃-30℃. Any temperatures above or below this range will shorten the life of the Battery Pack.
2-7 If the water comes into the Notebook PC DO NOT turn on the Notebook PC immediately. Disconnect the outlet cable and detach the Battery Pack in order to turn off the Notebook PC, instead of pressing the POWER button to turn off it. Disconnect all external devices. Spill out the water from the Notebook PC. Use a soft and waterish paper or cloth to wipe the surface of the Notebook PC lightly.
3. Traveling with the Notebook PC Turn off the Notebook PC and disconnect all lines before moving it. Following the below steps, if you want to travel with your Notebook PC. 3-1 Attention 1. Charge the Battery Pack and the spare Battery Pack fully. 2. Turn off the Notebook PC and disconnect from the wall outlets. 3. Shut down the LCD Screen completely and smoothly. 4. Disconnect the AC lines. 5. Disconnect all lines. 6.
4. Keep the data for future possible use Your computer has been fully tested and complies with the system specifications before shipping. However, incorrect operations, mishandling or any other reasons may loss your data, e.g.: Delete or cover the data by error, Damage the HDD by vibration, Damaged by Network virus, Disaster, Loss the data because of being stolen. 4-1 HDD Partition The damage of the HDD or the operating system may be result in the loss of the data in the HDD.
5. Getting Started 5-1 Install the Rechargeable Battery Power the Notebook PC before using it. There are two ways to power the Notebook PC: Use the AC Adapter to power it or use the removable Battery Pack. The Notebook PC is designed to work with a removable Battery Pack. Your Notebook PC may or may not have its Battery Pack installed.
5-3 Connecting the Power Adapter The Notebook PC comes with a universal AC-DC adapter and the allowable input voltage of adapter is from 100V to 240V. Following the below steps to connect the adapter: 1. Take the adapter and the power cord, and then connect the adapter with the power cord. 2. Plug the DC end of adapter into the power jack of the Notebook PC. 3. Insert the AC end to the wall outlet 4. Check the connections above correctly before turning on the Notebook PC.
6. Using Your Notebook PC 6-1 Turning on the Notebook PC 1. Open the LCD screen and adjust the angle of the Notebook PC’s LCD Screen 2. Press the POWER button to turn on the Notebook PC. 6-2 Adjust the Brightness of LCD Screen The Notebook PC uses an active matrix TFT LCD and provides a Display (Monitor) Output Port to connect the external monitor. The Notebook PC supports the function to adjust the LCD Screen through the following composite buttons.
Function Keys These function keys with the color word or icon sign means that their function only can be activated when clicking the function key and the key at the same time. +:Turn on or turn off the camera window. +:Turn on or turn off the WiFi. +:Turn on or turn off the mute. +:Turn down the volume. +:Turn up the volume. +:Play or pause the playback. +:Return to the previous track.
7. Internet Connection 7-1 Connect the Lineate LAN Before connecting the network with your computer, setup your network system first, and then connect telecommunication line to your Netbook PC. Setting the Network system Click the right button of the mouse on the “My Network Places”, click the left button of the mouse on the “Properties” item to enter the “Network Connections” windows, as show below: Contact your Internet service provider for more information about the setting of IP and DNS.
7-2 Wireless LAN Click + to turn the wireless network on or off. When the wireless network turns on, the WIFI Indicator turns on and the icon of WIFI will display on the right-bottom of the desktop.
8. Power Managing System 8-1 Battery System The Netbook PC is designed to work with a removable and high capability Battery Pack. 8-1-1 Checking Battery Power Click the left button of the mouse on “Start”→“Control Panel”→“Performance and Maintenance “ , then click “Power Options”, the menu will display as below. On the window, click the left button of the mouse on “Power Meter” label to check the power of the battery.
8-1-2 Charging the Battery Pack When you use your Netbook PC first time, check the remaining battery power, and make sure that the new Battery Pack has been completely charged before the Netbook PC is disconnected from external power. The Battery Pack begins to charge as soon as the Netbook PC is connected to the external power, and the Charge Indicator light will turn on. When the Battery Pack charges completely, the Charge Indicator light will turn off.
The life expectancy of the Battery Pack is approximately 300 recharges. Store the Battery Pack in cool and dry place, the ideal temperature is from 10℃ to 30℃. The Battery Pack will discharge quickly in hot environment and the life of the Battery Pack will be shortened. DO NOT throw the Netbook PC in municipal waste. Check local regulations for disposal of electronic products. DO NOT put the Battery Pack near or in the fire, or else it may cause fire or explode.
8-3 Power Saving When you use a battery as the source power for your Netbook PC, you can take advantage of power management settings to conserve battery life. 8-3-1 Connect the Adapter without using Battery Pack The Battery Pack has a limit on the number times it can be recharged. DO NOT use the Battery Pack if you have the adapter. 8-3-2 Adjust the brightness of LCD Screen If necessary, adjust the brightness of the LCD Screen in order to save the electric power.
9. Upgrading Your Notebook PC 9-1 Connect the External Monitor The Notebook PC supplies a VGA port for connecting External Monitor or projective device. 9-1-1 How to connect the External Monitor 1. Turn off the Notebook PC and insert the 15-pin D-sub monitor plug to the external monitor. 2. Turn on the Notebook PC. +:Shift between LCD Screen and external monitor. 9-1-2 Connect Keyboard and Mouse The Notebook PC’s integrated a keyboard with 84 keys.
9-1-4 Lock Port The Lock Port allows the Notebook PC to be secured using and can prevent the Notebook PC to be removed from a fixed object. 9-2 Enter the BIOS Setup Menu Follow the below steps to enter the BIOS Setup Menu: 1. Click F2 button quickly during loading the system, then the system will enter “Setup Utility” as shown below: 2.
3. Click the up/down direction keys to select “Boot Type Order” and click the Enter button to enter the below menu: 4. Click the “Shift” + ”+”or click ”-“ directly to remove the item position and then click the up/down direction button to select the startup option.
To enter WINDOWS XP at the first time since recovered preinstalled status, the system would run auto-load procedure that may need about 5 minutes. Please don’t do any operation during loading and the system would popup the warning of restart the computer as below, clicking “OK” to restart the computer to finish the system initialization. Be sure to copy the data to other storage device before recovery. Don’t adjust HDD partition manually, or it would lead to the recovery disabled.
10. Appendix 10-1 Troubleshooting Q1:How to turn off the Notebook PC when the halted system cannot warm boot? A:Press the POWER button and hold 4 or 6 seconds to turn off the Notebook PC. Q2:How to check the Notebook PC if the Notebook PC cannot be turned off? A:1.If the power is low, connect to the electric outlets. 2.Check that the video display system is not in the external monitor mode. 3.Make sure the indicator of the adapter turns on and the adapter works well. 4.
10-2 Specifications Main Feature CPU Intel Atom N270 (1.6GHz, 533MHz FSB) CPU Power Consumption 2.5W MAX L1 Cache Size On-die, primary 32-kB instructions cache and 24-kB, write-back data cache L2 Cache Size 512-kB on-die second level cache Memory (#) 1GB(Max 2GB) Memory Type DDRII 533/667 MHz Storage HDD Capacities (#) 160GB TFT Screen TFT Screen Size 10” inch Screen Type TFT Description TFT LCD 1024X600 Built-in Camera Resolution 1.
Power Adapter AC 100~240V; DC 12V Output Power (maximum) ≤36W Battery (Type) Lithium rechargeable battery Voltage 7.4V Port Standard LAN Type: 10/100Base-T LAN Wireless Card: 802.11 b/g Headphone Port, Speaker, Built-in Microphone, Audio Port Microphone Port USB Port USB-A Port(x3),USB2.0 SD Card Port Support SD/MMC/MS Card Express Card Port Express Card/34 VGA Port D-15 Output Physical Features Weight No battery About 1.1Kg With battery About 1.4Kg Dimension 253*189*36.
Customer Support For techn cal support or product serv ce, see the table below or contact your reseller. NOTE: You w ll need the product ser al number. Country/Region Website T = Telephone F = FAX Email Austral a/New Zealand www.v ewson c.com.au AUS= 1800 880 818 NZ= 0800 008 822 serv ce@au.v ewson c.com Canada www.v ewson c.com T (Toll-Free)= 1-866-463-4775 T (Toll)= 1-424-233-2533 F= 1-909-468-1202 serv ce.ca@v ewson c.com Europe www.v ewson ceurope.
Limited Warranty VIEWSONIC® NETBOOK What the warranty covers: ViewSonic warrants its products to be free from defects in material and workmanship during the warranty period. If a product proves to be defective in material or workmanship during the warranty period, ViewSonic will, at its sole option, repair or replace the product with a similar product. Replacement Product or parts may include remanufactured or refurbished parts or components.
Limitation of implied warranties: There are no warranties, express or implied, which extend beyond the description contained herein including the implied warranty of merchantability and fitness for a particular purpose. Exclusion of damages: ViewSonic’s liability is limited to the cost of repair or replacement of the product. ViewSonic shall not be liable for: 1.