VFD1028w Digital Photo Frame User Guide Model No.
Compliance Information FCC Statement This device complies with part 15 of FCC Rules. Operation is subject to the following two conditions: (1) this device may not cause harmful interference, and (2) this device must accept any interference received, including interference that may cause undesired operation. This equipment has been tested and found to comply with the limits for a Class B digital device, pursuant to part 15 of the FCC Rules.
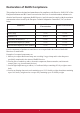
Declaration of RoHS Compliance This product has been designed and manufactured in compliance with Directive 2002/95/EC of the European Parliament and the Council on restriction of the use of certain hazardous substances in electrical and electronic equipment (RoHS Directive) and is deemed to comply with the maximum concentration values issued by the European Technical Adaptation Committee (TAC) as shown below: Proposed Maximum Concentration Actual Concentration Lead (Pb) 0.1% < 0.1% Mercury (Hg) 0.
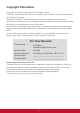
Copyright Information Copyright© ViewSonic Corporation, 2013. All rights reserved. ViewSonic, the three birds logo, OnView, ViewMatch, and ViewMeter are registered trademarks of ViewSonic Corporation. Disclaimer:ViewSonic Corporation shall not be liable for technical or editorial errors or omissions contained herein; nor for incidental or consequential damages resulting from furnishing this material, or the performance or use of this product.
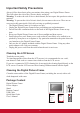
Important Safety Precautions Always follow these basic safety precautions when using your Digital Picture Frame. This will reduce the risk of fire, electric shock, and injury. Warning: To reduce the risk of fire or shock hazard, do not expose this product to rain or moisture. Warning: To prevent the risk of electric shock, do not remove the cover. There are no user-serviceable parts inside. Refer all servicing to qualified personnel. • The Digital Picture Frame is for indoor use only.
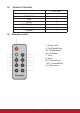
Table of Contents 1. Hardware---------------------------------------------------------------------------- 1 1.1. Specifications------------------------------------------------------------------ 1 1.2. Identification of Controls---------------------------------------------------- 1 1.3. Accessories -------------------------------------------------------------------- 2 1.4. Features------------------------------------------------------------------------- 2 1.5.
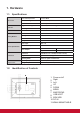
1. Hardware 1.1. Specifications LCD screen Fhoto File Panel size/ Aspect ratio 10.1 inch/ Wide Effective viewing area 8.2” W x 4.1” H ( 208.3 mm x 104.1 mm) Resolution 1024 x 600 pixels Image formats supported JPG, JPEG (baseline coding), BMP Max. image resolution 30 million pixels Calendar Memory Medium Electric Specification Clock, Calendar Internal 128 MB Memory Card MMC, SD, SDHC ( max.
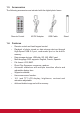
1.3. Accessories The following accessories are included with the digital photo frame. Remote Control AC/DC Adapter USB Cable Stand 1.4. Features • • • • • • • • • • • Remote control and hard keypad control. Playback of photo stored on data storage devices through High-Speed USB 2.0 port, card-reader port or the built-in memory. Data storage devices: USB disk, SD, MS, MMC card. Multi-language OSD supports: English, French, Spanish. File format: JPG, BMP. Photo Play Sequence: sequence, random.
1.5. Features Checklist Remote control and keypad control SD/MS/MMC USB Photo 10.1” TFT-LCD display Built-in memory Calendar VFD1028w √ √ √ √ √ √ √ 1.6.
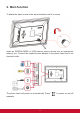
2. Main function To attach the stand, screw in the stand clockwise until it is secure. Insert an SD/SDHC/MMC or USB memory source device into an appropriate memory slot. Connect the supplied power adapter to the photo frame and to an electrical outlet. The photo frame will power on automatically. Press “ manually.
On the Main Menu, there are 【Photo】【 Calendar】【Setting 】. This photo frame searches the memory source device after power on and playback photos in slideshow mode if there are photos found. If there is no photo found, the Main Menu will be shown. 2.1. Photo Insert a memory card or USB flash drive with the photo on it into the photo frame if you had not done so. Select【Photo】 from the main menu, press the ENTER button, this photo frame will start slideshow automatically.
2.1.1. Browse Buttons Functional descriptions Exit to thumbnail view Previous photo Next photo --Toggle Browse and Slideshow modes 2.1.2.
2.2. Calendar Select【Calendar】from the main menu, press the ENTER button to view the calendar. Monthly calendar mode is the default. 2.2.1. Display Mode The date and time displayed on the calendar are the current date and time set in the system. 2.2.1.1 Monthly calendar In this mode, photos are shown in slideshow on the top right.
2.2.1.2 Calendar In this mode, photos are shown in slideshow on the right. Buttons Functional descriptions Exit to the main menu Previous photo Next photo --Toggle Monthly calendar, Calendar (day), and Clock viewing modes 2.2.1.3 Clock In this mode, an analog clock is shown in the center.
Buttons Functional descriptions Exit to the main menu --Toggle Monthly calendar, Calendar (day), and Clock viewing modes 2.3. Settings Select【Setting】from the main menu, press the “ENTER” button or press the 【SETUP】button on the remote control to enter the Settings Menu. The Photo, Calendar, and System settings are shown below. Press the Up【▲】or Down【▼】button to highlight a setting category, then 【ENTER】 button to enter the setup submenu.
2.3.1. Photo Setting Press the Up【▲】or Down【▼】button to highlight Photo Setting, then 【ENTER】 button to enter the setup submenu. Press the Left【◄】or Right 【►】button to change the entry field. Press the Up【▲】or Down【▼】button to move between entry fields.
2.3.3. System Setting Press the Up【▲】or Down【▼】button to highlight System Setting, then 【ENTER】button to enter the setup submenu. Press the Left【◄】or Right 【►】button to change the entry field. Press the Up【▲】or Down【▼】button to move between entry fields.
3. Troubleshooting Symptoms Solutions Cannot power on, even when the device is connected to an electrical outlet. • Check whether the AC power adapter rating is correct, and it is securely plugged to the device and to an electrical outlet. Failed to read memory card • Check whether memory card is inserted properly. The notch should match the label on the device.
Customer Support For technical support or product service, see the table below or contact your reseller. Note: You will need the product serial number. Country/ Region Web Site Australia/New Zealand www.viewsonic.com.au Canada www.viewsonic.com Europe www.viewsoniceurope.com www.viewsoniceurope.com/uk/Support/Calldesk.htm Hong Kong www.hk.viewsonic.com T= 852 3102 2900 service@hk.viewsonic.com India www.in.viewsonic.com T= 1800 11 9999 service@in.viewsonic.com Ireland (Eire) www.
Limited Warranty VIEWSONIC Digital Photo Frame What the warranty covers: ViewSonic warrants its products to be free from defects in material and workmanship, under normal use, during the warranty period. If a product proves to be defective in material or workmanship during the warranty period, ViewSonic will, at its sole option, repair or replace the product with a like product. Replacement product or parts may include remanufactured or refurbished parts or components.