
User Guide
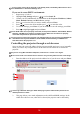


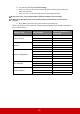


Table Of Contents
- Table of contents
- Important safety instructions
- Introduction
- Positioning your projector
- Connection
- Operation
- Starting up the projector
- Using the menus
- Utilizing the password function
- Switching input signal
- Adjusting the projected image
- Magnifying and searching for details
- Selecting the aspect ratio
- Optimizing the image
- Setting the presentation timer
- Hiding the image
- Locking control keys
- Operating in a high altitude environment
- Using the CEC function
- Using the 3D functions
- Controlling the projector through a LAN environment
- Using the projector in standby mode
- Adjusting the sound
- Shutting down the projector
- Menu operation
- Maintenance
- Troubleshooting
- Specifications
- Copyright information

40
iii. You can adjust the LAN Control Settings.
iv. Once set, access to the remote network operation on this projector has been
password-protected.
v. Once set, access to the tools page has been password-protected.
To prevent errors, only input the English alphabet and digits on the tools page.
After making the adjustments, press the Send button and the data will be saved for the
projector.
vi. Press Exit to go back to the remote network operation page.
Please pay attention to the limitation of input length (including space and other punctuation
keys) in the list blow:
Category Item Input Length
Maximum Number of
Characters
Crestron Control
IP Address 16
IP ID 4
Port 5
Projector
Projector Name 32
Location 32
Assigned To 32
Network Configuration
DHCP (Enabled) (N/A)
IP Address 16
Subnet Mask 16
Default Gateway 16
DNS Server 16
User Password
Enabled (N/A)
New Password 26
Confirm 26
Admin Password
Enabled (N/A)
New Password 26
Confirm 26