
User Guide


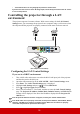
Table Of Contents
- Table of contents
- Important safety instructions
- Introduction
- Positioning your projector
- Connection
- Operation
- Starting up the projector
- Using the menus
- Utilizing the password function
- Switching input signal
- Adjusting the projected image
- Magnifying and searching for details
- Selecting the aspect ratio
- Optimizing the image
- Setting the presentation timer
- Hiding the image
- Locking control keys
- Operating in a high altitude environment
- Using the CEC function
- Using the 3D functions
- Controlling the projector through a LAN environment
- Using the projector in standby mode
- Adjusting the sound
- Shutting down the projector
- Menu operation
- Maintenance
- Troubleshooting
- Specifications
- Copyright information

35
• The Zoom function can only magnify the pictures to limited sizes.
If you discover the inversion of the 3D image depth, set the 3D Sync Invert function to “Invert”
to correct the problem.
Controlling the projector through a LAN
environment
The projector supports Crestron
®
software. With correct settings for the LAN Control
Settings menu, you can manage the projector from a computer using a web browser when
the computer and the projector are properly connected to the same local area network.
Configuring the LAN Control Settings
If you are in a DHCP environment:
1. Take a RJ45 cable and connect one end to the RJ45 LAN input jack of the projector
and the other end to the RJ45 port.
2. Open the OSD menu and go to the ADVANCED > LAN Control Settings menu.
3. Press Enter. The LAN Control Settings page is displayed.
4. Highlight LAN Settings and press / to select DHCP ON.
5. Press to highlight Apply and press Enter.
6. Please wait for around 15 - 20 seconds, and then re-enter the LAN Control Settings
page. The Projector IP Address, Subnet Mask, Default Gateway, and DNS Server
settings will be displayed. Note down the IP address displayed in the Projector IP
Address row.
If the Projector IP Address still does not appear, contact your network administrator.
If the RJ45 cables are not properly connected, the Projector IP Address, Subnet Mask, Default
Gateway, and DNS Server settings will display 0.0.0.0. Make sure the cables are properly
connected and perform the procedures above again.
(An example of connection)