
User Guide


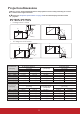


Table Of Contents
- Table of contents
- Important safety instructions
- Introduction
- Positioning your projector
- Connection
- Operation
- Starting up the projector
- Using the menus
- Utilizing the password function
- Switching input signal
- Adjusting the projected image
- Magnifying and searching for details
- Selecting the aspect ratio
- Optimizing the image
- Setting the presentation timer
- Hiding the image
- Locking control keys
- Operating in a high altitude environment
- Using the CEC function
- Using the 3D functions
- Controlling the projector through a LAN environment
- Using the projector in standby mode
- Adjusting the sound
- Shutting down the projector
- Menu operation
- Maintenance
- Troubleshooting
- Specifications
- Copyright information

6
Remote control
To use the remote mouse control keys
(Page Up, Page Down, , and
), see
"Using the remote mouse control" on
page 8 for details.
•Power
Toggles the projector between standby
mode and Power ON.
•COMP1
Selects source from Computer In 1
port for display.
•COMP2
Selects source from Computer In 2
port for display.
•HDMI
Selects source from HDMI port for
display.
• Auto Sync
Automatically determines the best
picture timings for the displayed
image.
• / / / (Keystone keys)
Manually corrects distorted images
resulting from an angled projection.
•Enter
Enacts the selected On-Screen Display
(OSD) menu item.
•
Displays the Corner Adj. page.
•Menu
Turns on the On-Screen Display
(OSD) menu.
• Left/ Right/ Up/ Down
Selects the desired menu items and
makes adjustments.
COMP1 COMP2 HDMI
Source
PgUp
Mouse Pattern Blank
PgDn
Eco
Mode
Color
Mode
Audio
Mode
Auto
Sync
Menu Exit
Enter