
User Guide


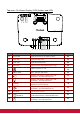


Table Of Contents
- S2 ViewSonic Pro9 UM-VS-EN-20160706.pdf
- Getting Started
- Setup and Operation
- On-Screen Display (OSD) Menu Settings
- Maintenance and Security
- Troubleshooting
- Specifications
- Regulatory Compliance
- Appendix I
- Appendix II

2
Views of Projector Parts
Front-right View
ITEM
LABEL
DESCRIPTION
SEE PAGE
1.
Lamp Cover
Remove cover to replace lamp.
55
2.
Tilt Adjuster
Rotate adjuster lever to adjust angle position.
14
3.
Lens
Projection Lens.
4.
IR Receiver
Receives IR signal from remote control.
7
5.
LEDs
Displays the projector status.
3
6.
Vent
Cool air intake.
60
7.
Vertical Lens Shift
Adjusts the image position vertically.
18
8.
Horizontal Lens Shift
Adjusts the image position horizontally.
20
9.
Zoom Ring
Enlarges the projected image.
21
10.
Focus Ring
Focuses the projected image.
21
11.
Function Keys
On-Screen Display (OSD) buttons.
3
Important:
Ventilation openings on the projector allow for good air circulation, which keeps the projector lamp
cool. Do not obstruct any of the ventilation openings.
1 2 3 4 5 2
7