
Lamp Swapping Instruction


2
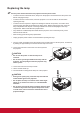
6. Asshowinthegure,insertthenewlamp.Alignthelampusing
thealignmentholesandgentlypushthelampintothelocked
position.
CAUTION
• Thelampmodulemustsitsecurelyinplaceandthelamp
connectormustbeconnectedproperlybeforetightening
thescrews.
• Pullingittooquicklymaycausethelamptobreakand
scatterbrokenglassintheprojector.
• Do not place the lamp in locations where water might
splashonit,childrencanreachit,ornearammable
materials.
• Donotinsertyourhandsintotheprojectorafterthelampisremoved.Ifyoutouchthe
opticalcomponentsinside,itcouldcausecolorunevennessanddistortionoftheprojected
images.
• Donottouchglassoflampwithbarehands.Oilsfrom
theskincancreateahotspotonthelampandmay
resultwithdamagetothelamp.
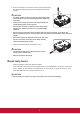
7. Tightenthescrewsthatsecurethelampcover.
CAUTION
• Loosenscrewmaycauseabadconnection,which
couldresultinmalfunction.
• Donotovertightenthescrew.
Reset lamp hours
• Resetthelamptimerafternewlampisinstalled.
• Afterpoweringontheprojector,opentheOSDmenu.GotoADVANCED>Advanced>LampHour
Reset,“Pleaseseeusermanual“messageshownonscreenwhenyoupressEnterbutton.Then
press▼▲◄►buttonstoresetthelamphourto“0”.
CAUTION
• Donotresetifthelampisnotneworreplacedasthiscouldcausedamage.
6-2
6-1
6-1
7-2
7-1