ViewSonic PJ656 LCD Projector ®
Compliance Information For U.S.A. This device complies with part 15 of the FCC Rules. Operation is subject to the following two conditions: (1) The device may not cause harmful interference, and (2) this device must accept any interference received, including interference that may cause undesired operation. This equipment has been tested and found to comply with the limits for a Class B digital device, pursuant to part 15 of the FCC Rules.
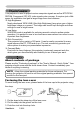
Important Safety Instructions 1. Read these instructions completely before using the equipment. 2. Keep these instructions in a safe place. 3. Heed all warnings. 4. Follow all instructions. 5. Do not use this equipment near water. 6. Clean with a soft, dry cloth. If further cleaning is required, see “Cleaning the Display” in this guide for further instructions. 7. Do not block any ventilation openings. Install the equipment in accordance with the manufacturer’s instructions. 8.
Copyright Information Copyright © ViewSonic® Corporation, 2005. All rights reserved. Macintosh and Power Macintosh are registered trademarks of Apple Computer, Inc. Microsoft, Windows, Windows NT, and the Windows logo are registered trademarks of Microsoft Corporation in the United States and other countries. ViewSonic, the three birds’ logo, OnView, ViewMatch, and ViewMeter are registered trademarks of ViewSonic Corporation. VESA is a registered trademark of the Video Electronics Standards Association.
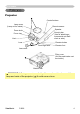
Contents of package (1) Projector (2) Remote control with two AA batteries (3) Power cord (4) RGB cable (5) Audio/Video cable (6) Soft case (7) Quick Start Guide and ViewSonic Wizard CD (8) Lens cover, Rivet and Strap VIDEO RGB ASPECT MAGNIFY ON OFF SEARCH AUTO HOME PAGE UP END PAGE DOWN FREEZE BLANK VOLUME MUTE KEYSTONE MENU POSITION ENTER ESC (1) RESET (2) (4) (6) (3) (5) (7) (8) NOTE • Keep the original packing materials for future reshipment.
Content Content About this manual . . . . . . . . . . 1 Content . . . . . . . . . . . . . . . . . . 2 Projector features . . . . . . . . . . 3 Preparations . . . . . . . . . . . . . . 3 About contents of package . . . . . . . 3 Fastening the lens cover . . . . . . . . . 3 Part names . . . . . . . . . . . . . . . 4 Projector . . . . . . . . . . . . . . . . . . . . . 4 Control buttons . . . . . . . . . . . . . . . . 6 Remote control . . . . . . . . . . . . . . . . 6 Setting up . . . . . . . . . . . . . . . .
Projector features / Preparations Projector features This projector is used to project various computer signals as well as NTSC/PAL/ SECAM, Component (SD, HD) video signals onto a screen. It requires just a little space for installation and gets a large image from short distance. High Brightness Newly developed 180W UHB (Ultra High Brightness) lamp gives you a higher brightness image on a screen. The image can be still kept as bright and clean enough for use in bright rooms.
Part names Part names Projector Control buttons Lamp cover (Lamp unit is inside.) Remote sensor Speaker Zoom knob Security bar (Use for attaching a commercial anti-theft chain or wire.) Focus ring Vent Lens Elevator button Front-Right side Elevator foot Lens cover Filter cover (Air filter and intake vent are inside.) Bottom side WARNING ►During use or immediately after use, do not touch around the lamp and vents of the projector. ( ) It could cause a burn.
Part names Power switch AC inlet Elevator button Ports (See below.) Elevator foot Rear-Left side CONTROL port AUDIO-OUT port AUDIO IN2 L/R port (In the default setting, the AUDIO IN2 L/R port is the audio port for the VIDEO, S-VIDEO and COMPONENT VIDEO ports, however it is possible to change the settings.) COMPONENT VIDEO ports Y CB/PB CR/PR Vent Restart switch (*) RGB IN1 port2) RGB IN2 /RGB OUT port (Use the RGB IN OUT switch to select RGB IN2 or RGB OUT for this port.
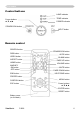
Part names Control buttons LAMP indicator TEMP indicator Cursor buttons ▲,▼,◄,► POWER indicator STANDBY/ON button INPUT button Remote control SEARCH button RGB button VIDEO button ASPECT button HOME button STANDBY/ON button AUTO button BLANK button PAGE UP button VOLUME button MAGNIFY ON button OFF button PAGE DOWN button END button KEYSTONE button MUTE button FREEZE button POSITION button MENU button Cursor buttons ▲,▼,◄,► ESC button ENTER button RESET button Battery cover (on the back) Vie
Setting up Setting up WARNING ►Place the projector in a stable position horizontally. A fall or a turnover could cause an injury and/or damage to the projector. Using a damaged projector could result in a fire and/or an electric shock. • Do not place the projector on an unstable, slant or vibrant surface such as a wobbly or inclined stand. • Do not place the projector in the side/front/rear-up position, except cleaning the air filter. ►Place the projector in a cool and well ventilated location.
Setting up Arrangement Refer to the illustrations and tables below to determine the screen size and projection distance. (a) The screen size (diagonal) (b) (b) Distance from the projector to the screen (±10%) (c) The height of the screen (±10%) 4:3 (a) (c) up 16:9 (a) (c) down At 4 : 3 Screen (a) Screen size [inch (m)] 4 : 3 screen (b) Projection distance [m (inch)] min. max. (c) Screen height [cm (inch)] up down 30 (0.8) 0.9 (36) 1.1 (43) 40 50 60 70 80 90 100 120 150 200 250 300 (1.
Setting up Adjusting the projector's elevator CAUTION ►If you press the elevator button without holding the projector, the projector might crash down, overturn, smash your fingers and possibly result in malfunction. To prevent damaging the projector and injuring yourself, always hold the projector whenever using the elevator buttons to adjust the elevator feet. ►Do not incline the projector rightward or leftward. Also do not incline it backward or forward exceeding 9 degrees.
Setting up Using the Security Bar WARNING ►Do not use the security bar to prevent the projector from falling. Dropping or knocking over the projector may cause damage or injury. CAUTION ►The security bar is not a comprehensive theft prevention measure. It is intended to be used as an extra theft prevention measure. A commercial anti-theft chain or wire can be attached to the security bar on the projector. to attach 1. How An anti-theft chain or wire can be attached as shown in the illustration.
Setting up Connecting your devices CAUTION ►Turn off all devices prior to connecting them to the projector. Attempting to connect a live device to the projector may generate extremely loud noises or other abnormalities that may result in malfunction and/or damage to the device and/or projector. ►Use the accessory cable or a designated-type cable for the connection. Some cables have to be used with core set. A too long cable may cause a certain picture degradation.
Setting up Examples of connection with a computer * In the default setting, the AUDIO IN1 port is the audio port for the RGB IN1 and RGB IN2 ports. To change the settings, refer to the AUDIO item in the SETUP menu. RGB cable RGB out USB cable Audio out RS-232C USB RS-232C cable Stereo mini audio cable Stereo mini audio cable RGB out Audio out Use the RGB IN OUT switch to select RGB IN2 (RGB IN2 is selected if the switch is not pushed in).
Setting up Examples of connection with a VCR/DVD player * In the default setting, the AUDIO IN2 L/R port is the audio port for the VIDEO, S-VIDEO and COMPONENT VIDEO ports. To change the settings, refer to the AUDIO item in the SETUP menu.
Setting up Connecting power supply WARNING ►Please use extra caution when connecting the power cord, as incorrect or faulty connections may result in fire and/or electrical shock. • Only use the power cord that came with the projector. If it is damaged, contact your dealer for a replacement. • Only plug the power cord into an outlet rated for use with the power cord's specified voltage range. • Never modify the power cord. Never attempt to defeat the ground connection of the three-pronged plug.
Remote control Remote control Putting batteries WARNING ►Always handle the batteries with care and use them only as directed. Improper use may result in battery explosion, cracking or leakage, which could result in fire, injury and/or pollution of the surrounding environment. • Be sure to use only the batteries specified. Do not use batteries of different types at the same time. Do not mix a new battery with used one. • Make sure the plus and minus terminals are correctly aligned when loading a battery.
Remote control Using the remote control CAUTION ►Be careful in handling the remote control. • Do not drop or expose the remote control to physical impact. • Do not get the remote control wet or place it on wet objects. It may result in malfunction. • Remove the batteries from the remote control and store them in a safe place if you won’t be using the remote control for an extended period. • Replace the batteries whenever the remote control starts malfunctioning.
Power on/off Power on/off WARNING ►When the power is on, a strong light is emitted. Do not look into the lens of projector. Also, do not peep at the inside of projector through a hole. NOTE • Turn the power on/off in right order. Please power on the projector prior to the connected devices. Power off the projector later than the connected devices. Turning on the power 1. STANDBY/ON POWER Make sure that the power cord is firmly and indicator button correctly connected to the projector and the outlet.
Operating Operating Adjusting the volume the VOLUME button on the remote control. 1. Press A dialog will appear on the screen to aid you in adjusting the volume. the cursor buttons ▲/▼ to adjust the volume. 2. Use To close the dialog and complete the operation, press the VOLUME button again. Even if you don’t do anything, the dialog will automatically disappear after a few seconds. Temporarily muting the sound the MUTE button on the remote control. 1.
Operating Selecting an input signal (continued) the VIDEO button on the remote control to select an 1. Press input for video signal. Each time you press the button, the projector switches its video input port as below.
Operating Using the automatic adjustment feature 1. Press the AUTO button on the remote control. VIDEO RGB SEARCH For an RGB signal The vertical position, the horizontal position, the clock phase and the horizontal size will be automatically adjusted. And the aspect ratio will be automatically selected. Make sure that the application window is set to its maximum size prior to attempting to use this feature. A dark picture may still be incorrectly adjusted. Use a bright picture when adjusting.
Operating VIDEO Correcting the keystone distortions the KEYSTONE button on the remote control. A 1. Press dialog will appear on the screen to aid you in correcting the RGB MAGNIFY ON OFF SEARCH AUTO BLANK HOME PAGE UP VOLUME END PAGE DOWN ASPECT MUTE distortion. Use the cursor buttons ▲/▼ to correct the distortion. To close the dialog and complete this operation, press the KEYSTONE button again. Even if you don’t do anything, the dialog will automatically disappear after a few seconds.
Operating Freezing the screen the FREEZE button on the remote control. 1. Press The “FREEZE” indication will appear on the screen, and the VIDEO RGB SEARCH AUTO BLANK HOME PAGE UP VOLUME END PAGE DOWN MUTE ASPECT MAGNIFY ON projector will enter the FREEZE mode. To exit the FREEZE mode and restore the screen to normal, press the FREEZE button again.
Operating Operating the computer screen CAUTION ►Mistaken use of the mouse/keyboard control could damage your equipment. • While using this function, please connect only with a computer. • Before connecting, read the manuals of the computer you will connect. NOTE • It may not be possible to control notebook PC, and other computers with built-in pointing device (e.g. track ball), using this remote control.
Multifunctional settings Multifunctional settings Using the menu function VIDEO RGB SEARCH This projector has the following menus: PICTURE, IMAGE, INPUT, SETUP, SCREEN, OPTION, and EASY MENU. EASY MENU cosists of functions often used, and the other menus are classified into each purpose. Each of these menus is operated using the same methods. The basic operations of these menus are as follows.
Multifunctional settings EASY Menu With the EASY MENU, items shown in the table below can be performed. Select an item using the cursor buttons ▲/▼ on the projector or remote control. Then perform it referring to the following table. Item ASPECT KEYSTONE Description Using the buttons ◄/► switches the mode for aspect ratio. See the ASPECT item in the IMAGE menu. Using the buttons ◄/► corrects the keystone distortion. See the item KEYSTONE of section SETUP menu.
Multifunctional settings EASY Menu (continued) Item Description Using the buttons ◄/► switches the mode for mirror status. See the MIRROR item in the SETUP menu. MIRROR RESET Performing this item resets all of the items of EASY MENU except FILTER TIME and LANGUAGE. A dialog is displayed for confirmation. Selecting RESET using the button ▲ performs resetting. FILTER TIME Performing this item resets the filter timer which counts usage time of the air filter. A dialog is displayed for confirmation.
Multifunctional settings PICTURE Menu With the PICTURE menu, the items shown in the table below can be performed. Select an item using the cursor buttons ▲/▼ on the projector or remote control, and press the cursor button ► on the projector or remote control, or the ENTER button on the remote control to execute the item. Then perform it referring to the following table.
Multifunctional settings PICTURE Menu (continued) Item Description Using the buttons ▲/▼ switches the mode of color temperature. HIGH MIDDLE LOW CUSTOM To adjust CUSTOM COLOR TEMP Selecting the CUSTOM and then pressing the ENTER : button ► or the ENTER button displays a dialog OFFSET GAIN to aid you in adjusting the OFFSET and/or GAIN R G B R G B of the CUSTOM mode. OFFSET adjustments change the color intensity on the whole tones of the test pattern.
Multifunctional settings PICTURE Menu (continued) Item Description PROGRESSIVE Using the buttons ▲/▼ switches the progress mode. TV FILM TURN OFF • This function is performed only for an interlaced signal of a VIDEO input, an S-VIDEO input or CONPONENT VODEO input of 525i (480i) or 625i (576i) signal. • When TV or FILM is selected, the screen image will be sharp. FILM adapts to the 2-3 Pull-Down conversion system.
Multifunctional settings IMAGE Menu With the IMAGE menu, items shown in the table below can be performed. Select an item using the cursor buttons ▲/▼ on the projector or remote control, and press the cursor button ► on the projector or remote control, or the ENTER button on the remote control to execute the item. Then perform it referring to the following table.
Multifunctional settings IMAGE Menu (continued) Item Description Using the buttons ▲/▼ adjusts the horizontal size. Large Small • This item can be selected only for an RGB signal. • When this adjustment is excessive, the picture may not be displayed correctly. In such a case, please reset the adjustment by pressing the RESET button on the remote control during this operation. H SIZE AUTO ADJUST EXECUTE ViewSonic Selecting this item performs the automatic adjustment feature.
Multifunctional settings INPUT Menu With the INPUT menu, the items shown in the table below can be performed. Select an item using the cursor buttons ▲/▼ on the projector or remote control, and press the cursor button ► on the projector or remote control, or the ENTER button on the remote control to execute the item. Then perform it referring to the following table.
Multifunctional settings INPUT Menu (continued) Item Description Selecting this item displays a dialog titled “INPUT INFORMATION”. It shows the information about the current input. INPUT-INFORMATION RGB 1024x768 @60.0 FRAME LOCK INFORMATION ViewSonic INPUT-INFORMATION S-VIDEO SECAM AUTO INPUT-INFORMATION COMPONENT 576i @50 SCART RGB • The “FRAME LOCK” message on the dialog means the frame lock function is working.
Multifunctional settings SETUP Menu With the SETUP menu, the items shown in the table below can be performed. Select an item using the cursor buttons ▲/▼ on the projector or remote control, and press the cursor button ► on the projector or remote control, or the ENTER button on the remote control to execute the item. Then perform it referring to the following table.
Multifunctional settings SCREEN Menu With the SCREEN menu, the items shown in the table below can be performed. Select an item using the cursor buttons ▲/▼ on the projector or remote control, and press the cursor button ► on the projector or remote control, or the ENTER button on the remote control to execute the item. Then perform it referring to the following table. Item :SELECT MENU [RGB] PICTURE IMAGE INPUT SETUP SCREEN OPTION EASY MENU LANGUAGE MENU POSITION OSD BRIGHT.
Multifunctional settings SCREEN Menu (continued) Item Description Using the buttons ▲/▼ switches the mode for the start-up screen. The start-up screen is a screen displayed when no signal or an unsuitable signal is detected. MyScreen ORIGINAL TURN OFF MyScreen is a screen you can register as a desired screen.The ORIGINAL screen is the existing standard screen. When TURN OFF is selected, the BLACK screen is used.
Multifunctional settings SCREEN Menu (continued) Item MESSAGE ViewSonic Description Using the buttons ▲/▼ turns on/off the message function. TURN ON TURN OFF When the TURN ON is selected, the following message function works. “AUTO IN PROGRESS” while automatically adjusting ”NO INPUT IS DETECTED” ”SYNC IS OUT OF RANGE” "Searching….” while searching for the input ”Detecting….
Multifunctional settings OPTION Menu With the OPTION menu, the items shown in the table below can be performed. Select an item using the cursor buttons ▲/▼ on the projector or remote control, and press the cursor button ► on the projector or remote control, or the ENTER button on the remote control to execute the item, except for the items LAMP TIME and FILTER TIME. Then perform it referring to the following table.
Multifunctional settings OPTION Menu (continued) Item Description Selecting this item displays the SERVICE menu. Select an item using the buttons ▲/▼, and press the button ► or the ENTER button on the remote control to execute the item. FAN SPEED AUTO ADJUST GHOST KEY LOCK FILTER MESSAG FACTORY RESET SERVICE ViewSonic FAN SPEED Using the buttons ▲/▼ switches the rotation speed of the cooling fans. The HIGH is the mode for use at highlands etc.
Maintenance Maintenance Lamp WARNING HIGH VOLTAGE HIGH TEMPERATURE HIGH PRESSURE ►The projector uses a high-pressure mercury glass lamp. The lamp can break with a loud bang, or burn out, if jolted or scratched, handled while hot, or worn over time. Note that each lamp has a different lifetime, and some may burst or burn out soon after you start using them.
Maintenance Lamp (continued) A lamp has a finite product life. Using the lamp for long periods of time cause the pictures to darken or poor color tone. Note that each lamp has a different lifetime, and some may burst or burn out soon after you start using them. Preparation of a new lamp and early replacement are recommended. To obtain a new lamp, contact your dealer and tell the lamp type number. Lamp part number = RLC-013. the projector off, and unplug the power cord. Allow the lamp to cool for 1.
Maintenance Air filter WARNING ►Before handling the projector, ensure the power switch is off and the power cable is not plugged in. Then, allow the projector to sufficiently cool. Handling while the projector while hot could cause an electric shock, a burn and/or malfunction to the projector. ►Only use the specified air filter. Do not use the projector with the air filter and the filter cover removed. It could result in a fire and/or malfunction to the projector. ►The air filter should be cleaned periodically.
Maintenance Air filtre (continued) Apply a vacuum cleaner to the air filter and the filter cover. Please replace the air filter when it is damaged or too soiled. Replace the air filter in its original position. Secure the air filter in place by pressing each of the six locations. Make sure there is no dust or dirt remaining after the cover is in place. If any Air filter’s dust or dirt remains use a vacuum cleaner knob to remove it as when placing the filter cover on the air filter.
Maintenance Other care WARNING ►Before handling the projector, ensure the power switch is off and the power cable is not plugged in. Then, allow the projector to sufficiently cool. Handling while the projector while hot could cause an electric shock, a burn and/or malfunction to the projector. ►Never try to care for the inside of the projector personally. Doing is so dangerous. ►Avoid wetting the projector or inserting liquids in the projector.
Troubleshooting Troubleshooting Related messages When the unit's power is on, messages such as those shown below may be displayed. When any such message is displayed on the screen, please follow the instructions described below. If the same message is displayed after the remedy, or if a message other than the following appears, please contact your dealer or service company.
Troubleshooting Regarding the indicator lamps Lighting and flashing of the POWER indicator, the LAMP indicator, and the TEMP indicator have the meanings as described in the table below. Please follow the instructions within the table. If the same indication is displayed after the remedy, or if an indication other than the following is displayed, please contact your dealer or service company. LAMP TEMP POWER Description indicator indicator indicator Turned The projector is in a standby state.
Troubleshooting Regarding the indicator lamps (continued) LAMP TEMP POWER indicator indicator indicator Description The cooling fan is not operating. Blinking In Red or Lighting In Red Turned off Blinking In Red Please turn the power off, and allow the projector to cool down at least 20 minutes. After the projector has sufficiently cooled down, please confirm that no foreign matter has become caught in the fan, etc., and then turn the power on again.
Troubleshooting Phenomena that may be easy to be mistaken for machine defects WARNING ►Never use the projector if abnormal operations such as smoke, strange odor, excessive sound, damaged casing or elements or cables, penetration of liquids or foreign matter, etc. should occur. In such cases, immediately turn off the power switch and then disconnect the power plug from the power outlet. After making sure that the smoke or odor has stopped, contact your dealer or service company.
Troubleshooting Phenomena that may be easy to be mistaken for machine defects (continued) Phenomenon Cases not involving a machine defect The signal cables are not correctly connected. Correctly connect the audio cables. The MUTE function is working. Sound does not come out. Restore the sound pressing the MUTE or VOLUME button on the remote control. The volume is adjusted to an extremely low level. The AUDIO setting is not correct. Correctly set the AUDIO item in the SETUP menu.
Troubleshooting Phenomena that may be easy to be mistaken for machine defects (continued) Phenomenon Cases not involving a machine defect The brightness and/or contrast are adjusted to an extremely low level. Adjust BRIGHTNESS and/or CONTRAST settings to a higher level using the menu function. Pictures appear dark. The WHISPER function is working. 25 Select NORMAL for the WHISPER item in the SETUP menu. 25 The lamp is approaching the end of its product lifetime. 40, 41 Replace the lamp.
Warranty And After-Service Warranty and after-service If a problem occurs with the equipment, first refer to the “Troubleshooting” and run through the suggested checks. If this does not resolve the problem, please contact your dealer or service company. They will tell you what warranty condition is applied. Specifications Specifications NOTE • These specifications are subject to change without notice. Item Specification Product name Liquid Crystal panel Liquid crystal projector Panel size 1.5 cm (0.
Specifications Specifications (continued) ViewSonic PJ656 52
Customer Support For technical support or product service, see the table below or contact your reseller. Note : You will need the product serial number. T=Telephone Country/ Region Web Site United States www.viewsonic.com/support/ Canada www.viewsonic.com/support T=(866) 463 4775 service.ca@viewsonic.com United Kingdom www.viewsoniceurope.com/uk T= 0207 949 0307 service.eu@viewsoniceurope.com Europe, Middle East, Baltic countries, and North Africa www.viewsoniceurope.
Limited Warranty ViewSonic Projector ® What the warranty covers: ViewSonic warrants its products to be free from defects in material and workmanship during the warranty period. If a product proves to be defective in material or workmanship during the warranty period, ViewSonic will at its sole option repair or replace the product with a like product. Replacement product or parts may include remanufactured or refurbished parts or components.