ViewSonic ® PJ256D DLP Projector - User Guide - Guide de l'utilisateur - Bedienungsanleitung - Guía del usuario - Guida dell'utente - Guia do usuário - Användarhandbok - Käyttöopas - Pyководство польэователя - 使用手冊 - 使用手冊
Compliance Information For U.S.A. This device complies with part 15 of the FCC Rules. Operation is subject to the following two conditions: (1) The device may not cause harmful interference, and (2) this device must accept any interference received, including interferencee that may cause undesired operation This equipment has been tested and found to comply with the limits for a Class B digital device, pursuant to part 15 of the FCC Rules.
Important Safety Instructions 1. Read these instructions completely before using the equipment. 2. Keep these instructions in a safe place. 3. Heed all warnings. 4. Follow all instructions. 5. Do not use this equipment near water. 6. Clean with a soft, dry cloth. 7. Do not block any ventilation openings. Install the equipment in accordance with the manufacturer’s instructions. 8.
Copyright Information Copyright © 2005 ViewSonic® Corporation. All rights reserved. Apple, Mac and ADB registered trademarks of Apple Computer, Inc. Microsoft, Windows, Windows NT, and the Windows logo are registered trademarks of Microsoft Corporation in the United States and other countries. ViewSonic, the three birds logo and OnView are registered trademarks of ViewSonic Corporation. VESA and SVGA are registered trademarks of the Video Electronics Standards Association.
Table of Contents Precautions ....................................................................................................... 2 Product Features ............................................................................................... 4 Package Overview ............................................................................................ 5 Product Overview .............................................................................................. 6 Main Unit .........................
Precautions Follow all warnings, precautions and maintenance as recommended in this user’s guide to maximize the life of your unit. Warning- Do not look into the projector’s lens when the lamp is on. The bright light may hurt your eyes. Warning- To reduce the risk of fire or electric shock, do not expose this product to rain or moisture. Warning- Please do not open or disassemble the product as this may cause electric shock.
Do: Turn off the product before cleaning. Use a soft cloth moistened with mild detergent to clean the display housing. Disconnect the power plug from AC outlet if the product is not being used for a long period of time. Don’t: Block the slots and openings on the unit provided for ventilation. Use abrasive cleaners, waxes or solvents to clean the unit. Use under the following conditions: - In extremely hot, cold or humid environments. - In areas susceptible to excessive dust and dirt.
Product Features This product is an XGA single chip 0.7” DLPTM projector. Outstanding features include: True XGA, 1024 x 768 addressable pixels Single chip DLPTM technology NTSC/NTSC4.
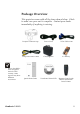
Package Overview This projector comes with all the items shown below. Check to make sure your unit is complete. Contact your dealer immediately if anything is missing. Due to the difference in applications for each country, some regions may have different accessories. ViewSonic PJ256D Projector with lens cap Power Cord VGA Cable 1.
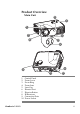
Product Overview Main Unit 8 1 2 3 7 4 6 5 8 1 9 1. 2. 3. 4. 5. 6. 7. 8. 9. 10.
Control Panel 7 1 2 3 4 10 5 9 8 1. 2. 3. 4. 5. 6. 7. 8. 9. 10.
Connection Ports 1 7 6 5 4 3 2 1. IR Receiver 2. Power Socket 3. PC Analog signal/SCART RGB/HDTV/Component Video Input Connector 4. Composite Video Input Connector 5. S-Video Input Connector 6. USB Input Connector 7.
Remote Control with Mouse Function & Laser Pointer 1 2 3 7 ViewSonic PJ256D 8 4 9 5 10 6 16 11 15 12 14 13 1. 2. 3. 4. 5. 6. 7. 8. 9. 10. 11. 12. 13. 14. 15. 16.
Connecting the Projector RGB USB 6 2 1 7 4 DVD Player, Settop Box, HDTV receiver 5 3 Video Output Due to the difference in applications for each country, some regions may have different accessories. S-Video Output 1. ............................................................................................................ Power Cord 2. ............................................................................................................. VGA Cable 3. ..................................
Powering On/Off the Projector Powering On the Projector 1. Remove the lens cap. n 2. Ensure that the power cord and signal cable are securely connected. The Power LED will turn Orange. 3. Turn on the lamp by pressing “Power/Standby” button on the control panel. o The startup screen will display for 10 seconds and the Power LED will turn green. 4. Turn on your source (computer, notebook, video player, etc.). The projector will detect your source automatically.
Powering Off the Projector 1. Press the “Power/Standby” button to turn off the projector lamp, you will see a message as below on the on-screen display. 2. Press the “Power/Standby” button again to confirm. Otherwise the message will disappear after 25 seconds. 3. The cooling fans continue to operate for about 120 seconds for cooling cycle and the Power LED will flash orange. When the light stops flashing, the projector has entered standby mode.
Adjusting the Projected Image Adjusting the Projector Image Height The projector is equipped with an elevator foot for adjusting the image height. To raise the image: 1. Press the elevator button n. 2. Raise the image to the desired height angle o, then release the button to lock the elevator foot into position. 3. Use p to fine-tune the display angle. To lower the image: 1. Press the elevator button. 2. Lower the image, then release the button to lock the elevator foot into position. 3.
Adjusting the Projector Zoom / Focus You may turn the zoom lever to zoom in or out. To focus the image, rotate the focus ring until the image is clear. The projector will focus at distances from 4.9 to 32.8 feet (1.5 to 10.0 meters). Zoom Lever Focus Ring Adjusting Projection Image Size 246.1" (625.0cm) Diagonal 73.8" (187.5cm) 36.9" (93.8cm) 31.7" (80.5cm) 63.4" (160.9cm) 123.0" (312.5cm) 105.6" (268.2cm) 172.2" (437.5cm) 147.8" (375.5cm) 196.9" (500.0cm) 169.0" (429.2cm) 211.2" (536.5cm) 4.
Control Panel & Remote Control There are two ways for you to control the functions: Remote Control and Control Panel. Control Panel Remote Control Using the Control Panel Power/Standby 4 Refer to the “Power On/Off the Projector” section on pages 11-12. Source 4 Press “Source” to choose RGB, Component-p, Component-i, S-Video, Composite Video and HDTV sources. Menu 4 Press “Menu” to launch the on screen display (OSD) menu. To exit OSD, press “Menu” again.
Using the Remote Control Power 4 Refer to the “Power On/Off the Projector” section on pages 11-12. Source 4 Press “Source” to choose RGB, Component-p, Component-i, S-Video, Composite Video and HDTV sources. Auto 4 Automatically synchronizes the projector to the input source. Keystone 4 Adjusts image distortion caused by tilting the projector (±8 degrees). Press “Keystone” button, then use setting. to adjust the Hide 4 “Hide” immediately turns the screen black.
On Screen Display Menus The Projector has multilingual On Screen Display menus that allow you to make image adjustments and change a variety of settings. The projector will automatically detect the source. How to operate 1. To open the OSD menu, press “Menu ” on the Remote Control or Control Panel. 2. When OSD is displayed, use keys to select any item in the main menu. While making a selection on a particular page, press or “Enter” key to enter sub menu. 3.
Menu Tree ViewSonic PJ256D 18
Language Language Choose the multilingual OSD menu . Use the select your preferred language. or key to Press “Enter” to finalize the selection. Colour Setting Colour Setting Adjust the Red, Green, Blue, Yellow, Cyan and Magenta colors for advanced adjustment of the individual colors.
Image-I Display Mode There are many factory presets optimized for various types of images. 4 PC: For computer or notebook. 4 Movie: For home theater. 4 sRGB: For standard color. 4 User: Memorize user’s settings. Brightness Adjust the brightness of the image. 4 Press the to darken image. 4 Press the Contrast to lighten the image. The contrast controls the degree of difference between the lightest and darkest parts of the picture.
Saturation “Saturation” function is not supported under computer mode. Adjusts a video image from black and white to fully saturated color. 4 Press the to decrease the amount of color in the image. 4 Press the to increase the amount of color in the image. Sharpness Adjusts the sharpness of the image. 4 Press the 4 Press the ViewSonic PJ256D to decrease the sharpness. to increase the sharpness.
Image-II Frequency “Frequency”changes the display data frequency to match the frequency of your computer’s graphic card. If you experience a vertical flickering bar, use this function to make an adjustment. Phase “Phase” synchronizes the signal timing of the display with the graphic card. If you experience an unstable or flickering image, use this function to correct it. “Frequency/Phase/ Hor. Position/Ver. position” function is not supported under video mode. Hor.
Management Menu Location Choose the menu location on the display screen. Projection 4 Front-Desktop The factory default setting. 4 Rear-Desktop When you select this function, the projector reverses the image so you can project behind a translucent screen. 4 Front-Ceiling When you select this function, the projector turns the image upside down for ceiling-mounted projection. 4 Rear-Ceiling When you select this function, the projector reverses and turns the image upside down at same time.
Translucence Choose the menu transparency on the display screen. Reset Return the adjustments and settings to the factory default values. 4 Execute: Returns the settings for all menus to factory default values.
Lamp Setting Projection Hours Display the projection time. Lamp Hours Display the cumulative lamp operating time. Lamp Reset Reset the lamp life hour after replacing a new lamp. Lamp Reminding Choose this function to show or to hide the warning message when the changing lamp message is displayed. The message will show up 30 hours before end of life. ECO Mode Choose “On” to dim the projector lamp which will lower power consumption and extend the lamp life by up to 130%.
Troubleshooting If you experience trouble with the projector, refer to the following information. If the problem persists, please contact your local reseller or service center. Problem: No image appears on screen. 4 Ensure all the cables and power connections are correctly and 4 4 4 securely connected as described in the “Installation” section. Ensure the pins of connectors are not crooked or broken. Check if the projection lamp has been securely installed.
4. Verify the resolution setting is less than or equal to 1280 x 1024 resolution. 5. Select the “Change” button under the “Monitor” tab . 6. Click on “Show all devices.” Next, select “Standard monitor types” under the SP box; choose the resolution mode you need under the “Models” box. 4 If you are using a Notebook: 1. First, follow the steps above to adjust resolution of the computer. 2. Press the toggle output settings.
Problem: Image is out of focus 4 Adjusts the Focus Ring on the projector lens. Refer to page 14. 4 Make sure the projection screen is between the required distance 4.9 to 32.8 feet (1.5 to 10.0 meters) from the projector. Problem: The image is stretched when displaying 16:9 DVD. The projector automatically detects 16:9 DVD and adjusts the aspect ratio by digitizing to full screen with 4:3 default setting.
Problem: Message Reminders 4 Standby : 4 Replacing the lamp : ViewSonic PJ256D 29
Replacing the lamp The projector will detect the lamp life itself. It will show you a warning message “Lamp life exceeded” When you see this message, change the lamp as soon as possible. Make sure the projector has been cooled down for at least 30 minutes before changing the lamp. Warning: Lamp compartment is hot! Allow it to cool down before changing lamp! 1 3 2 4 Lamp Replacing Procedure: Warning: To reduce the risk of personal injury, do not drop the lamp module or touch the lamp bulb.
Compatibility Modes Remark : 1.> “ * ”compressed computer image. 2.> The interlaced analog signals are not supported. ViewSonic PJ256D Mode Resolution VESA VGA VESA VGA (ANALOG) V.Frequency (Hz) H.Frequency (kHz) 640 x 350 70 31.5 640 x 350 85 37.9 VESA VGA 640 x 400 85 37.9 VESA VGA 640 x 480 60 31.5 VESA VGA 640 x 480 72 37.9 VESA VGA 640 x 480 75 37.5 VESA VGA 640 x 480 85 43.3 VESA VGA 720 x 400 70 31.5 VESA VGA 720 x 400 85 37.9 SVGA 800 x 600 56 35.
Customer Support For technical support or product service, see the table below or contact your reseller. NOTE: You will need the product serial number. Country/Region Web site T = Telephone F = FAX Email United States www.viewsonic.com/support/ T= (800) 688-6688 F= (909) 468 1202 service.us@ viewsonic.com Canada www.viewsonic.com/support/ T= (866) 463 4775 service.ca@ viewsonic.com United Kingdom www.viewsoniceurope.com/uk T= 0207 949 0307 service.eu@ viewsoniceurope.
LIMITED WARRANTY VIEWSONIC® PROJECTOR What the warranty covers: ViewSonic warrants its products to be free from defects in material and workmanship during the warranty period. If a product proves to be defective in material or workmanship during the warranty period, ViewSonic will at its sole option repair or replace the product with a like product. Replacement product or parts may include remanufactured or refurbished parts or components.