
User Guide

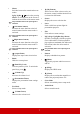


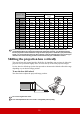
Table Of Contents
- Table of contents
- Important safety instructions
- Introduction
- Positioning your projector
- Connection
- Operation
- Starting up the projector
- Using the menus
- Utilizing the password function
- Switching input signal
- Adjusting the projected image
- Magnifying and searching for details
- Selecting the aspect ratio
- Optimizing the image
- Setting the presentation timer
- Hiding the image
- Locking control keys
- Operating in a high altitude environment
- Using the CEC function
- Using the 3D functions
- Controlling the projector through a LAN environment
- Using the projector in standby mode
- Adjusting the sound
- Shutting down the projector
- Menu operation
- Maintenance
- Troubleshooting
- Specifications

6
Remote control
To use the remote mouse control keys
(Page Up, Page Down, , and
), see
"Using the remote mouse control" on
page 8 for details.
•Power
Toggles the projector between standby
mode and Power ON.
•COMP
Selects source from Computer In
port for display.
•HDMI
Selects source from HDMI port for
display.
•VIEDO
Selects VIEDO source for display.
• Auto Sync
Automatically determines the best
picture timings for the displayed
image.
• / (Keystone keys)
Manually corrects distorted images
resulting from an angled projection.
•Enter
Enacts the selected On-Screen Display
(OSD) menu item.
•Menu
Turns on the On-Screen Display
(OSD) menu.
• Left/ Right/ Up/ Down
Selects the desired menu items and
makes adjustments.