
User manual


6. Installation
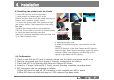
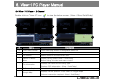
6.3 Installing the product into the Cradle
1. Insert SD memory card to the product
2. Hold product so camera part is at the
2.
Hold
product
so
camera
part
is
at
the
bottom and then slide it into the cradle from top to
bottom until it makes a clicking sound
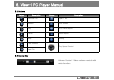
3. Connect the power cable from product to cigar
jack of your vehicle. Then organize the lines using
li li
1 2 3
li
ne c
li
ps
4. Adjust the camera angle to your preference
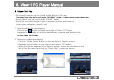
[TIP] Use TV-out cable to connect to nearest display
to check the actual recording view and
make sure hood and dashboard does not show over
RUBY Products :
4
make
sure
hood
and
dashboard
does
not
show
over
¼ of video’s bottom screen
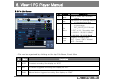
5. Remove the tape cover
6A hIRlihi f i h di i R
5 6
6
.
A
ttac
h
IR
li
g
h
t
i
ng
f
ac
i
ng t
h
e same
di
rect
i
on as
R
ear
Camera
[NOTE] If direction of the Rear Camera and IR Lighting
does not align, Rear Camera recordings might not record
correctly Please note vibrations and humidity of the
6.4 Confirmation
correctly
.
Please
note
vibrations
and
humidity
of
the
vehicle might detach the IR Lighting
1. Check to see that the SD card is correctly placed into the device and power switch is on
2. Start the car engine and check power is correctly connected to the device
2.
Start
the
car
engine
and
check
power
is
correctly
connected
to
the
device
3. Check Red LED is on following with Blue and Orange LED blinks.
4. Listen for 2 “beeps” followed by 5 “beep” sounds (booting complete, recording starts)
5. GPS connection can be confirmed as follows:.
If Blue LED blinks on and off GPS reception is not complete and still in search
11
If
Blue
LED
blinks
on
and
off
,
GPS
reception
is
not
complete
and
still
in
search
If Blue LED does not blink and stays on, GPS reception has been made