
Manual


Viega IM-PFMB 1007
22
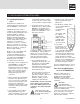
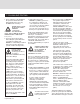
WATER CLOSET CONNECTIONS
Tighten fixture nut hand tight plus
an additional 1/4 turn. Check all
connections for leaks.
DO NOT OVERTIGHTEN.
Hose bibbs supported by the
structure can be connected directly.
HOSE BIBB CONNECTIONS
Free standing hose bibbs shall
not be supported by ViegaPEX.
Well-anchored
drop-ear ttings or
metal pipe shall be
used to install
hose bibbs.
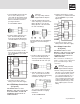
RISER CONNECTIONS
FAUCET CONNECTIONS
LAV or KITCHEN
Thread fixture nut onto fixture
shank. Tighten fixture nut hand
tight plus an additional 1/2 turn.
Slide compression nut and
supplied plastic ferrule over tube
as shown. The long taper of the
ferrule goes towards valve.
Tighten compression nut
according to valve manufacturer’s
recommendations.
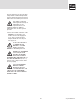
Tighten fixture nut hand tight plus
an additional 1/4 turn. Check all
connections for leaks.
DO NOT OVERTIGHTEN.
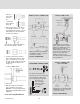
2. Slide a crimp ring (C) - XLCR2 for
3/8" tubing; XLCR3 for 1/2" - and
the supplied swivel nut (D) onto the
tubing (threads of the nut toward
the end of the tubing).
Insert the brass adapter (B) fully into
the end of the tubing as shown.
3. Slide the swivel nut (D) back to
brass adapter and slide the crimp
ring (C) to within 1/8" to 1/4" from
the end of tube. Crimp the ring with
an appropriately sized full-circle
crimp tool.
DO NOT CRIMP TWICE.
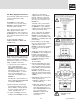
4. With the sealing element still in
place, thread the nut onto the
MANABLOC port and tighten hand
tight plus NO MORE THAN 1/8 turn
additional.
6.3 Connecting Distribution
Place the
w
et sealing
element
(A)...
...against the
brass adapter
flange (B).
(A) (B)