
Installation Guide


Viega IM-PFMB 1007
13
N
ote: these valves are field-repairable.
Contact Viega Customer Service for
more information on this procedure.
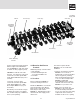
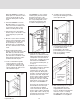
If a main inlet/outlet will not be used, it
must be capped (use Part No.
ECAP1).
The main service line to the
MANABLOC may include a main
shut-off valve, as required by local
code. Although a shutoff valve for the
main service line at the MANABLOC
itself is not required, it can be a
beneficial option for a homeowner and
is recommended.
Local code may also require the
installation of a check valve, PRV
(pressure reducing valve), back flow
preventer, etc. To prevent debris and
other particles from entering the
system, a strainer may be installed in
the service line.
4.7 Domestic Hot Water
Circulation Systems
ViegaPEX and the MANABLOC can
be used in continuously recirculating
domestic hot water plumbing loops,
provided:
1. The plumbing loops shall operate
with water temperatures of 140°F or
lower, as required by most model
plumbing codes.
2. The recirculating loop is for
supplying hot water more quickly
to the MANABLOC, not to circulate
through it or the distribution lines.
DO NOT include the MANABLOC
within a continuously
recirculating loop.
NOTE: The distribution lines and the
MANABLOC are not to be part of the
circulating system. The loop is to
provide hot water more quickly to the
MANABLOC only.
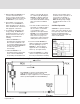
4.8 Multiple MANABLOC
Installations
If a home requires multiple
MANABLOCs to service the number
of fixtures in the home, these
guidelines should be followed if the
MANABLOCs are closely located
to each other.
• Consider dividing high demand
fixtures between the units.
• Consider a reasonable division, i.e.
upstairs/downstairs, east/west or
front/back.
Locating a Remote MANABLOC
A remote MANABLOC is sometimes
recommended to achieve maximum
efficiency from your MANABLOC
system.
• It can be advantageous when the
line lengths are excessive from one
centralized MANABLOC unit.
• When the home requires more than
one unit due to the number of
fixtures or size of the home, you
may want to consider locating a
remote unit near an outlying group
of fixtures.
4.9 ViegaPEX General
Design/Installation
Practices
This section only addresses general
design/installation practices for
ViegaPEX tubing, refer to the
PureFlow
®
Water Systems Installation
Manual for more detailed instructions.
Insulating each PEX tube individually
or as a group is not generally
necessary if the PEX tubing is
installed within the insulation envelope
of the structure, i.e. the heated area.
For example, the tubing may be
installed under the insulation in the
attic or within an interior wall of a
heated space.
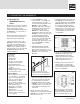
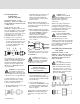
Use metallic connectors to attach PEX
to gas water heaters (Viega Part No.
XLSE4418, XLMSE4418 or similar
fabricated metallic assembly).
Install a minimum 18" of metallic or
other piping between the water heater
and PEX. For electric water heaters, it
is permissible to connect directly to
the inlets and outlets with a brass
swivel elbow or straight brass swivel
fitting.
Protect the PEX tubing with non-
metallic sleeving material where it
enters and/or exits a slab or at mass
penetrations. PEX need not be
sleeved its entire length within the
slab. However, full-length sleeving is
allowed. Penetrations through
concrete walls may be sleeved with a
larger size metal or plastic tube.
Protect the tubing from any sharp
edges where it enters and exits larger
sleeving material.
These are general guidelines to
consider when installing ViegaPEX
tubing with a MANABLOC system,
please refer to the
PureFlow
installation guide for more detail on
PEX tubing installations.