
Install Instructions


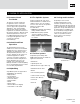


Viega IM-MTL 0612
724607
20
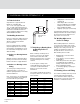
3. Remove burr from inside and outside
of piping to prevent cutting
sealing element.
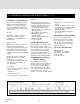
4. Mark proper insertion depth as
indicated by the ProPress Stainless
insertion depth chart. Improper
insertion depth may result in an
improper seal.
5. Check seal and grip ring for correct
fit. Illustration demonstrates proper
fit of grip ring, separation ring and
sealing element. Use only ProPress
shiny black EPDM sealing elements.
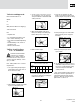
6. While turning slightly, slide press
fitting onto piping to the marked
depth. Do not use oils or lubricants.
7. Propress Stainless fitting connections
must be performed with ProPress
XL-C Rings and V2 ACTUATOR.
Use of ProPress XL Rings and/
or Actuator (for Bronze fittings) will
result in an improper connection.
See
RIDGID
®
Operator’s Manual for
proper tool instructions.
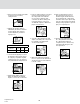
8. Open XL-C Ring and place at right
angles on the fitting. XL-C Ring must
be engaged on the fitting bead.
Check insertion depth.
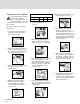
9. With V2 ACTUATOR inserted into
the tool, open the V2 ACTUATOR as
shown and connect V2 ACTUATOR
to the XL-C Ring.
10. Place V2 ACTUATOR onto XL-C
Ring and start pressing process.
Hold the trigger until the Actuator
has engaged the XL-C Ring. Keep
extremities and foreign objects away
from XL-C Ring and V2 ACTUATOR
during pressing operation to prevent
injury or incomplete press.
11. Release V2 ACTUATOR from
XL-C Ring and then remove the
XL-C Ring from the fitting on
completion of press. Remove tag
from fitting, indicating press has
been performed.
ProPress Stainless Insertion Depth Chart
Tube Size 2- 1/2"
3"
4"
Insertion Depth 1-5/8"
1-7/8"
2-3/8"