
Install Instructions
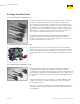
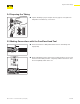
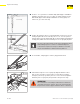
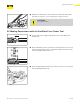
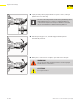
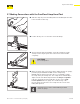
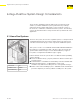

Table Of Contents
- About this Document
- Disclaimers
- Product Information
- Viega Manifolds
- Viega PureFlow Tubing
- Viega PureFlow Fittings
- Viega PureFlow System Design Considerations
- Water Service Installation
- Installing the ManaBloc
- Mounting the ManaBloc
- Installing Manifold Distribution Lines
- Installing the Viega PureFlow PEX Tubing System
- Fastening the Viega PureFlow System
- Installing Viega PureFlow Fittings
- Pressure Testing Viega PureFlow Systems
- System Disinfection
- Installer Checklist
- Limited Warranty

Viega PureFlow Fittings
27 of 88
IM-PF 724596 1021 PureFlow Water System (EN)
5.7 Making Connections with the PureFlow Crimp Hand Tool
▶ Slide the crimp ring onto the tubing and insert the tting into the tube
to the shoulder or tube stop.
▶ Position the ring ⅛" to ¼" from the end of the tubing.
1
/
8
” to ¼”
▶ The ring must be attached straight. Center the crimping tool jaws
exactly over the ring. Keep the tool at 90° and close the handles
completely.
CAUTION!
Do not crimp twice.
90°
▶ When checking crimp connections with a caliper (GO/NO GO gauge),
push the gauge STRAIGHT DOWN over the crimped ring.
NEVER slide the gauge in from the side. Do not attempt to gauge
the crimp at the jaw overlap area. The overlap area is indicated by a
slight removal of the blackening treatment. A crimp is acceptable
if the GO gauge ts the ring and the NO GO does not. A crimp
is unacceptable if the GO gauge does not t the ring or the
NO GO gauge does t. An incorrect crimp must be cut out of the
tubing and replaced.
Crimp dimensions can be veried with the provided
Go/No-Go gauge.