Fax Server Uno and Setup Manual 1.
Contents 1 Getting to know the Fax Server Uno ........................... 7 1.1 1.2 1.3 2 What's in the box ................................................................. 7 Connecting the Fax Server Uno ........................................... 8 Setting up the Fax Server Uno for operation ..................... 8 System settings ............................................................. 9 2.1 2.2 2.3 2.4 2.5 3 Set the Clock ......................................................................
.8 Printer address .................................................................... 25 4.9 Printer port ......................................................................... 25 4.10 Printer queue................................................................... 26 4.11 FTP user ............................................................................ 26 4.12 FTP password ................................................................... 27 4.13 FTP server port..................................
Introduction The Fax Fax Server Uno is a stand-alone network fax machine. Together with the Fax Server Easy Access Access software it forms a complete network faxing system. Faxes can be sent from every workstation on the network with the Fax Server Easy Access Access software. The Fax Server Easy Access Access software addresses the Fax Server Uno, which stores the fax and takes care of the actual fax transmission.
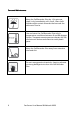
Care and Maintenance Keep the Call Recorder Pico dry. If it gets wet, wipe it dry immediately with a soft, clean cloth. Liquids might contain minerals that corrode the electronic circuits. Use and store the Call Recorder Pico only in temperature conditions between 0 and 40 degrees Celsius. Temperature extremes can shorten the life of electronic devices and distort or melt plastic parts. Keep the Call Recorder Pico away from excessive dust and dirt.
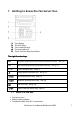
1 Getting to know the Fax Server Uno 1. 2. 3. 4. 5. The display. The Soft keys.. The numerical keys. The arrowed keys. The 8 function keys. See below. The eight function keys: Received faxes queue and Received faxes info key. See § 5.1 Sent faxes queue and Send faxes info key. See § 5.2 E-mail function key. See § 6 Empty queue function key. See § 5.5 Fax settings menu key. See § 3 Network settings menu key. See § 4 Disk info key. See § 5.6 System settings menu key. See § 2 1.
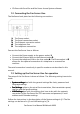
• CD-Rom with Send Fax and Fax Server Access System software. 1.2 Connecting the Fax Server Uno The FaxServer back plate has the following connections. 1. 2. 3. 4. 5. The Power socket. The Serial connection socket. The Ethernet connection socket. The telephone line The telephone connection. Connect the Fax Server Uno as follows. • Connect the Power supply to the power socket. 1 • Connect the Ethernet plug to the Ethernet socket 3 • Connect the telephone line to the Line socket 4.
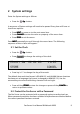
2 System settings Enter the System settings as follows. • Press the Sys button. A sequence of System settings will need to be passed. Every item will have at least three options: • Press NEXT to move on to the next menu item. • Press CHANGE to enter the value or property of the menu item. • Press STOP to exit the menu. Press NEXT repeatedly to scroll through the menu items. The following sequence of menu items will appear: 2.1 Set the Clock • Press the Sys button.
• Press the Sys button. • Press NEXT once. Password active: NEXT No CHANGE STOP • Press CHANGE to enter a password. Password: »000 STORE CANCEL • Press STORE to enable the entered password. • Press STOP to exit the menu. From this point on you will be prompted for the password before entering the menus. 2.3 Remove Password protection • Press the Sys button. • Enter the password and press CONTINUE. CONTINUE • Press NEXT once.
Language: NEXT English CHANGE STOP • Press CHANGE to select the preferred language. • Press STOP to save and exit the menu. 2.5 Reset all values Use Reset all values to reset all fax transmission and system values. • Press the Sys button. • Press NEXT four times. Reset all values: CHANGE No STOP • Press CHANGE to enable the Reset all values operation. Reset all values: CHANGE Yes STOP • Press STOP to execute the Reset all values operation.
Fax Server Uno Manual ©Vidicode 2008
3 Fax settings Enter the Fax settings as follows. • Press the Fax button. A sequence of Fax settings will need to be passed. Every item will have at least three options: • Press NEXT to save and move on to the next menu item. • Press CHANGE to enter or change the value or property of the menu item. • Press STOP to exit the menu. • Press NEXT repeatedly to scroll through the menu items. The following sequence of menu items will appear: 3.1 Fax ID The Fax ID is the actual identification of the fax machine.
Top Text: NEXT CHANGE STOP • Press CHANGE to enter the Top text. Top Text: » STORE CANCEL • Press STORE to save the Top text. • Press NEXT to move on to the next menu item. 3.3 Maximum Fax speed The fax transmission speed is negotiated between the two fax machines before the actual transmission of the fax takes place and depends on the quality of the telephone connection. The Maximum Fax speed is an upper limit to the transmission speed.
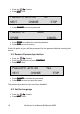
• Select a value between 0x and 15x. • Press NEXT to save and move on to the next menu item. 3.5 Send Retry time The Send retry time is the time the Fax Server will take to resend the fax. Send Retry: NEXT 120s CHANGE STOP • Press CHANGE to change the e Send retry time. • Select a value between 15 and 1800 seconds. • Press NEXT to save and move on to the next menu item. 3.
• Press CHANGE to enable Send Start Time. Keep pressing CHANGE to increase the start time. Press CHANGE once more after 23:45 to turn Off again. • Press NEXT to save and move on to the next menu item. It is still possible to send a fax directly when the Send Start Time has been enabled. In SendFax application the fax should be marked as Priority fax. See § 2.4 in the SendFax manual. 3.8 Fax to Printer The Fax to Printer property enables the use of a network printer.
Speaker: 0 NEXT CHANGE STOP • Press CHANGE to change speaker mode. Select a value between 0 and 7. • Press NEXT to save and move on to the next menu item. 3.11 Beep after Rx/Tx Beep after Rx/Tx lets the Fax Server sound a beep after a fax has been sent or received. Beep after Rx/Tx: Yes NEXT STOP CHANGE • Press CHANGE to enable or disable the Beep after Rx/Tx property. • Press NEXT to save and move on to the next menu item. 3.
3.13 No Answer time-out The No Answer timeout time determines the time the Fax Server will wait for the remote fax machine to answer the call. No Answer Timeout: 120s NEXT STOP CHANGE • Press CHANGE to change the No Answer timeout. Select a value between 20 and 180 seconds. It is advised to keep the default 60 second setting. • Press NEXT to save and move on to the next menu item. 3.
Caller ID is sent by the your service provider as it is commonly used on telephone lines. It is not to be confused with Fax ID or CSID. It is often an extra service to be ordered from your service provider to have Caller ID enabled on your telephone line. • Press NEXT to save and move on to the next menu item. 3.16 Rings to answer on Rings to answer on determines the number of times the telephone rings before the Fax Server answers the telephone call.
3.18 Ring variation Ring variation determines the variation in the sound of the ring. Ring variation: NEXT 2x5 CHANGE STOP • Press CHANGE to change the Ring variation property. Select a value between 1x3 and 3x12. • Press NEXT to save and move on to the next menu item. 3.19 Ring frequency Ring frequency determines the pitch of the ring. Ring frequency: No CHANGE STOP • Press CHANGE to change the Ring frequency property. Select a value between 400+50 and 3400+350.
4 LAN settings Enter the LAN settings as follows. • Press the LAN button. A sequence of LAN settings will need to be passed. Every item will have at least three options: • Press NEXT to move on to the next menu item. • Press CHANGE to enter or change the value or property of the menu item. • Press STOP to exit the menu. • Press NEXT repeatedly to scroll through the menu items. The following sequence of menu items will appear: 4.1 E-mail address The Fax Server has extensive E-mail capabilities.
4.2 Reply address Because the Fax Server cannot receive E-mail the E-mails sent by the Fax Server require another reply address. Reply: NEXT CHANGE STOP • Press CHANGE to enter the E-mail reply address. Reply: » STORE CANCEL Use the numerical keys to enter the E-mail reply address. • Press STORE to save the E-mail reply address. • Press NEXT to move on to the next menu item. 4.3 SMTP server IP address The Fax Server uses the IP address of the SMTP server to send E-mail.
• Press NEXT to move on to the next menu item. 4.4 SMTP server port SMTP-server port is the port number through which the Fax Server connection is to be made with the SMTP server. The SMTP-server port of the Fax Server is default set to 25. Do not change the SMTP-server port number when this value is not explicitly changed in the SMTP server. SMTP-server port: 25 NEXT STOP CHANGE • Press CHANGE to change the SMTP-server port number.
4.6 Domain name The domain name of the SMTP server is required as domain name in the Fax server. In case the SMTP server is on the network the network domain is required. In case the SMTP server is outside the network the domain name of the SMTP server is required. Contact your provider for more information. Domain: NEXT CHANGE STOP • Press CHANGE to enter the domain of the SMTP server. Domain: » STORE CANCEL Use the numerical keys to enter the domain of the SMTP server.
4.8 Printer address The printer address refers to the IP address of the network printer. Network printer will allow new faxes (sent and received) to be printed directly to a network printer. Here the main printer is defined. Printer: NEXT 0.0.0.0 CHANGE STOP • Press CHANGE to enter the IP address of the Printer. IP addr: »00:000:000:000 STORE CANCEL Use the numerical keys to enter the IP address of the Printer. • Press STORE to save the IP address of the Printer.
4.10 Printer queue Some printers require a printer queue name. Printer queue: NEXT FaxUno CHANGE STOP • Press CHANGE to enter the Printer queue name. Pr. queue: FaxUno STORE CLEAR CANCEL Use the numerical keys to enter the Printer queue name. • Press STORE to save the Printer queue name. • Press NEXT to move on to the next menu item. 4.11 FTP user The FTP user is administrators user name of the Fax Server. It can be used in the Fax Server Access System and Send Fax to log on to the Fax server.
4.12 FTP password The FTP password of the Fax Server is the password that goes with the FTP administrator user name of the Fax Server. FTP pwd: NEXT 0000 CHANGE STOP • Press CHANGE to change the FTP password. FTP pwd: » STORE CANCEL Use the numerical keys to enter the FTP password. • Press STORE to save the FTP password. • Press NEXT to move on to the next menu item. 4.
4.14 DHCP server In case a DHCP server is used on the network the DHCP server must be enabled. In case a DHCP server is not used on the network the DHCP server must be disabled. User DHCP server: No NEXT STOP CHANGE • Press CHANGE to enable DHCP server. User DHCP server: Yes NEXT STOP CHANGE • Press NEXT to save and move on to the next menu item. 4.15 IP address As part of the network the Fax Server needs an IP address.
4.16 IP subnet mask The IP subnet mask is used by the Fax server if access from outside the network is required. In this case the Gateway will need to be entered as well. In case the used SMTP server is not on the local network the IP mask and gateway need to be entered. IP mask: 255:255:255:000 NEXT CHANGE STOP • Press CHANGE to change the IP subnet mask of the Fax server. IP mask: »55:255:255:000 STORE CANCEL Use the numerical keys to enter the IP subnet mask of the Fax server.
4.18 IP name Aside from the IP address the Fax Server can also be addressed by an IP name if this function is supported by your DNS server. IP name: IPFax0001 CHANGE STOP • Press CHANGE to enter an IP name for the Fax server. IP name: » CANCEL Use the numerical keys to enter an IP name for the Fax server. • Press STORE to save the IP name of the Fax server. • Press NEXT to move on to the next menu item. 4.19 Network Time Server Network Time Server refers to the IP address of the Network Time Server.
4.20 NTP server port NTP server port is the port number through which the Fax Server connects to the Network Time Server. The NTP server port is default set to 123, as is the setting of the port number in most NTP servers. If there is no direct reason to change the NTP server port it is best left unchanged. NTP server port: NEXT 123 CHANGE STOP • Press CHANGE to change the NTP server port number. NTP server port: STORE » CANCEL Use the numerical keys to enter the NTP server port number.
TelNet active: NEXT No CHANGE STOP • Press CHANGE to enable TelNet. TelNet active: NEXT Yes CHANGE STOP • Press NEXT to save and move on to the next menu item. 4.23 Service timer The Service timer determines the performance of the network connection. Default the Service timer is set to Automatic. Changing the setting should only be done when advised by a service engineer to solve problems. Service Timer: Auto CHANGE STOP • Press CHANGE to change the Service timer.
5 Fax Server Uno function keys Under normal circumstances the Fax Server does not need much attention. Operation is done through the Fax Server Access System and Send Fax applications. Once the settings have been made the reception of faxes is done automatically. Received faxes are E-mailed to the programmed E-mail address. Received faxes can also be viewed over the network with the Fax Server Access System application.
Search the received faxes archive on time, date and/or Fax ID. Received on: »4-04-06 SEARCH TIME STOP In the search the date time and Fax ID is always incorporated. You are first prompted to enter the date. • Enter the date you want to search and press SEARCH to perform the search. If you want to search on date only the Fax Server uses wildcards in the search strings for the time and Fax ID. If you want to search according to date only you can enter wildcards for the date, e.g. **:**:**.
• Press QUEUE to view the Send faxes queue. The QUEUE contains all the Send faxes that still need to be sent. • Press ARCHIVE to enter the search the sent faxes The ARCHIVE contains all the sent faxes. Search the sent faxes archive on time, date or Fax ID. Sent on »4-04-06 ARCHIVE TIME STOP In the search the date time and Fax ID is always incorporated. You are first prompted to enter the date. • Enter the date you want to search and press SEARCH to perform the search.
Sent this fax? E-mail • • • • FAX BACK Choose E-mail or FAX to E-mail or fax the selected fax. Press CLEAR to clear the entry. Enter the E-mail address or fax number. Press SEND to email or enter a number and press START to send the fax. 5.4 Add a new E-mail address to the list The email list on the Fax Server Uno is normally edited with the Fax Server Setup application. See Chapter 6 for details. • Press the button to enter the E-mail list menu.
Test@address 256#845#973 SAVE STOP • Press SAVE to save the new entry in the E-mail list. From this point onwards all faxes received through extension numbers 256, 845 and 973 will be E-mailed to Test@address. 5.4.1 Edit the E-mail list The email list on the Fax Server Uno is normally edited with the Fax Server Setup application. See Chapter 6 for details. Edit the E-mail list as follows. • Press the button to enter the E-mail list menu.
The extension numbers need to be separated by the #, e.g. 256#845#973. • Press SAVE to save the Extension numbers. You will return to the E-mail list menu. • Press NEXT to select an other entry in the E-mail list or press STOP to exit the E-mail list menu. 5.5 Empty Send and Received queues The key opens the empty queue menu. • Press the key to enter the empty queue menu. Empty Queue RECEIVED SENT STOP • Press RECEIVED to empty the received queue. • Press SENT to empty the sent queue.
6 Fax Server Setup 6.1 Fax Server Setup Introduction The Fax Server Setup application is a tool for the network manager to create ftp accounts for users of the Fax Servers. The FTP user accounts are used to personalize the Fax Servers archive. The Fax Server will allow a user to view faxes that have been sent by specific users and to view faxes received on specific telephone extension numbers only. The Fax Server Setup does not keep any records by itself.
6.3 Installation Placing the CD-ROM in your computer gives you a choice of installation of Vidicode software. Choose to install the FaxServer Setup software. If the installation is not started automatically, start the FSSetup.exe file in the FSAS folder on the CD to start installation manually. Follow the instructions on the screen.
6.4 Setting up a Fax Server Uno When the program is started the following dialog appears: • Enter the FaxServer IP address. The port setting on the FaxServer is default set to 21. • Select the UserID’s tab. The Fax Server Setup will now come up with the following dialog for FTP username and password: • Enter the administrator ftp username and password. The Fax Server Setup will now make a connection to the fax server to retrieve user information.
Now select the UserID’s tab after the connection has terminated. The Userlist as on the Fax Server Uno is now displayed. If there is no user list present on the Fax Server Uno the dialog will be blank. 6.5 The user list The user list displays the User ID, The username the email address and the number. The User ID consists of two characters, the user ID is user throughout the Fax Server applications to identify a user. The UserName of the user is user as a more intuitive name for the user.
Enter the user properties of the new user. For every user there is an option to create an ftp account for the user. With the ftp account a user can setup a connection to the Fax Server Uno with the Fax Server Access System software to view his or her faxes on the Fax Server. For every user access to existing user accounts can be set. Check the checkboxes of existing users in the list to enable access to the faxes of said users. Click OK to finish. 6.
At this point the user profile has changed in the user list as displayed on your screen. To save the list on the Fax Server Uno the list needs to be transferred to the Fax Server. • Press “Update Update FaxServer” FaxServer to transfer the user profiles to the Fax Server.
7 Acknowledgements 7.1 Guarantee Your Fax Server Uno has a 12-month factory guarantee. The guarantee is effective for normal use only. We would like to emphasize that the guarantee is not valid under exceptional environmental conditions, such as extreme temperatures or humidity levels, nor in the unlikely event of a lightning strike. The guarantee is not valid if the machine has not been handled properly, for example when it has been dropped, or bumped into.
Fax Server Uno Manual ©Vidicode 2008
8 INDEX guarantee, 45 A Acknowledgements, 45 adapter, 7 Add E-mail address, 36 Archive Fax Server, 33 I IP address Fax Server, 28 L C Language Caller ID, 18 clock, 9 Connecting, 8 liability, 45 Fax Server, 11 N Network D Service timer, 32 day, 9 DHCP server, 28 dial prefix, 17 Disk info, 38 Domain name, 24 E Network settings Fax Server, 21 No Answer time-out, 18 No Carrier time-out, 18 P password protection Fax Server, 9 E-mail address Fax Server, 21 empty queue, 38 F Fax ID, 13 fax retri
speaker, 16 subnet mask, 29 T TelNet, 32 top line, 13 transmission speed V volume, 16 W wildcards, 34, 35 Fax Server, 14 48 Fax Server Uno Manual ©Vidicode 2008