
VoIP - User Manual


Call Recorder VoIP Manual EN © 2015 Vidicode®
5
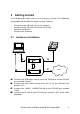
2 Getting started
The Call Recorder VoIP is set up in a sequence of steps. The following
paragraphs will describe the steps involved. They are:
• Connecting the CR-VoIP unit to the network
• Connecting the CR-VoIP unit to the PC by USB
• Software installation
• Set up of the software
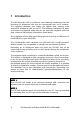
2.1 Hardware installation
USB
USB
USB
USB PC
PC
PC
PC
LA N
LA N
LA N
LA N
PH O N E
PH O N E
PH O N E
PH O N E
vidicode
vidicodevidicode
vidicode
Call Recorder VoIP
Call Recorder VoIPCall Recorder VoIP
Call Recorder VoIP
PC
LAN
A
B
C
D
A:
A:A:
A: Connect the LAN cable coming from the Telephone to the CR-VoIP
port marked “Phone”.
B:
B:B:
B: Connect the LAN cable coming from the PC to the CR-VoIP port
marked “PC”.
C:
C:C:
C: Connect the “WALL” VoIP/DATA-LAN to the CR-VoIP port marked
“LAN”.
D:
D:D:
D: Connect the PC-USB to the CR-VoIP port marked “USB” (with cable
supplied).