
Call Recorder Pico - User Manual

Call Recorder Pico Manual UK © 2009 Vidicode
8
2 Getting started
The Call recorder Pico is set up in a sequence of steps. The following
paragraphs will describe the steps involved. They are:
• Connecting the Pico to the telephone
• Connecting the Pico to the PC
• Software installation
• Set up of the software
2.1 Hardware installation
Depending on the kind of telephone you want to record from, the Pico
is connected to the telephone line or the telephone handset.
You will find instructions for recording from an analogue telephone line
or recording from the handset of a digital telephone.
The Call Recorder Pico works best with a properly installed sound card
or sound device in your PC. However, the Pico can also be connected to
external speakers. The signal on the speakers is a mono signal.
2.2 Notification
When recording a conversation with the Pico it is possible to notify your
conversation partner of the recording through a regularly returning
beep or through a spoken message. See § Setup3.3.3 about recording
and play back of the notification message.
2.3 Connecting the Call Recorder Pico
Determine the kind of telephone you want to connect the Pico to. This
will either be a normal (analogue) or digital (e.g. Key System, PBX, ISDN)
device. If you have an analogue telephone, use the “Record from
telephone line” method. If you have digital telephone, use the “Record
from handset” method.
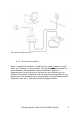
2.3.1 Record from telephone line
Record from telephone line can only be used if you have an analogue
telephone. When "record from telephone line" is used the Pico can
detect "on/off hook" straight from the telephone line.
The switch between the telephone sockets must
mustmust
must be in position I.
If you have a cordless analogue telephone set, connect the Pico to the
base unit.
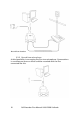
If you have ADSL, connect the Pico between the ADSL modem and the
telephone. See the diagram below.