Call Recorder Pico Manual Version 1.001.
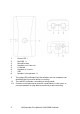
1. 2. 3. 4. 5. 6. 7. 8. Green LED * Red LED ** Record button Handset out / Line out I II Switch Handset in / Line in USB Speaker / microphone *** *) The green LED indicates that the software on the computer has detected the Pico and its driver is running. **) The red LED indicates a recording is being made. ***) Connect a microphone to record a conversation in the room, or connect speakers to play back a previously made recording.
Care and Maintenance Maintenance Keep the Call Recorder Pico dry. If it gets wet, wipe it dry immediately with a soft, clean cloth. Liquids might contain minerals that corrode the electronic circuits. Use and store the Call Recorder Pico only in temperature conditions between 0 and 40 degrees Celsius. Temperature extremes can shorten the life of electronic devices and distort or melt plastic parts. Keep the Call Recorder Pico away from excessive dust and dirt.
Contents 1 Introduction ................................................................ ................................................................ 7 2 Getting started................................ started............................................................ ............................................................ 8 2.1 Hardware installation.......................................................8 2.2 Notification.......................................................................
4 Playback and recording................................ recording .............................................. ..............................................23 ..............23 4.1 Normal playback .............................................................23 4.2 Playback in a call .............................................................23 4.2.1 Playback and recording control display.............................. 24 4.2.2 Hotkeys .............................................................
8 Acknowledgements ................................................... ...................................................43 ...................43 8.1 Privacy..............................................................................43 8.2 Liability ............................................................................43 Appendix A ................................................................ ....................................................................... ...........................
1 Introduction The Call Recorder Pico is a system to record and archive telephone calls on a PC. It consists of a PC application and one or more Call Recorders connecting the telephones to your PC. Depending on the number of USB ports and the capabilities of the PC, it is possible to record from up to any number of Call Recorders simultaneously (4 Call Recorders per 1Ghz). Every gigabyte of free disk space allows you to record up to 180 hours of conversation on your hard disk.
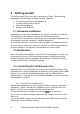
2 Getting started The Call recorder Pico is set up in a sequence of steps. The following paragraphs will describe the steps involved. They are: • Connecting the Pico to the telephone • Connecting the Pico to the PC • Software installation • Set up of the software 2.1 Hardware installation Depending on the kind of telephone you want to record from, the Pico is connected to the telephone line or the telephone handset.
Record from telephone line 2.3.2 Record from handset When "record from handset" is used the Pico needs to detect "on/off hook" by “listening” to the handset. The handset must be corded. The switch between the telephone sockets should be in position I. Depending on the wiring of your handset you may need to put it in position II if position I interferes with the normal working order of your telephone or the recordings are of poor quality. See also Problems with distorted audio § 6.5.
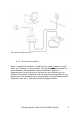
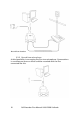
Record from handset 2.3.3 Record from microphone A third possibility is connecting the Pico to a microphone. Conversations in a conference room or office could be recorded with the Pico connected like this.
After connecting the Pico to the telephone line or microphone, it can be connected to the PC. 2.4 Connect the Pico to the PC Once the Pico is connected to the telephone it can be connected to the computer using the USB cable. 2.4.1 Connecting the first Call Recorder Pico The Pico can be connected to any free USB port or to a USB hub. If connected to a hub, this hub should have an external power supply. For Windows, 2000, XP and Vista the Pico will show up in the device list after a couple of seconds.
Only then you can proceed with the next steps of the installation: You will be asked: • to confirm the location on your hard drive where the software will be installed • specify a location for the data files • whether you want a desktop icon for the application When the installation is finished you will be asked to register your Pico on line. When the software starts for the first time you will be prompted to check for online updates. Please execute this check. 2.5.
consecutive devices. If you connect a number of Pico’s, make sure to give them a ‘device name’ , to make identification easier.
3 Options 3.1 Language The Pico software is translated into a number of languages. It is possible to change the display language at any time. • Select your language and click. 3.2 Device settings Following the description in the previous paragraph, start the software and open from the Options menu the Devices Devices screen. To the left you will see a list in a drop box of the available audio devices. All connected Pico’s should show up in the list.
Device is connected to the: the: • Select either the telephone Line or to the telephone Handset according to the way the Pico is connected. Enable recording by this device If you want the Pico to record, this checkbox should be checked (it is by default). At some point however, it could be necessary to disconnect one or more Pico’s. Use this checkbox to disable recording from the device, without having to physically disconnect it.
When the telephone is not used the audio level is close to zero. When a telephone conversation is started the software will detect an elevated audio level on the Pico. The Start/Stop level setting is used to determine the audio level above which recording should be started. The recording will be stopped again when the audio level drops below the Start/Stop level. However, the recording should not stop instantly.
AGC. Audio that rises above this level will be amplified to the Maximum level. Try to find a setting where both the local and remote voices are amplified without the background noise being amplified. If during playback the sound seems intermitted or contains gaps the Minimum level is probably set too high. If there is a lot of background noise during playback the Minimum level is probably set too low. Add microphone channel channel By default this option is not enabled.
By default the Pico records only the right channel because this normally contains both the local and the remote voice. If this is not the case, change it by enabling the options: • Add microphone channel • Record left channel 3.3 Setup 3.3.1 Playback To Playback any recording the Device and channel must be selected from the list. Commonly the computer’s soundcard will be used as device and the channel can either be WAVE or PC Speakers. The play back Volume Volume can be adjusted with the slider.
Minimum Duration Minimum Duration refers to the minimum duration of a recording for it to be stored. A standard setting would be 5 seconds. Recordings shorter than the set Minimum duration will not be stored. Ask to store When "Ask to store" is enabled, you will have an option to cancel a recording when it is finished. The "Ask to store"-dialog has a field to add Notes to the recording. Call Recording for Skype Software By default this option is disabled.
• Choose the Device to use for recording the notification message. On Windows XP and other older Windows versions it may be necessary to select the recording channel using the Windows Mixer. Check if your PC has a built in microphone. If not, use an external microphone or the microphone in the telephone handset. If you chose to use telephone‘s handset as the microphone there are two options: 1) 2) The Pico is connected on the handset of the telephone The Pico is connected to the telephone line.
Auto Auto play notification This option determines if the notification message is played automatically when a recording starts. • No - To playback the notification message, you have to press the Play notification button in the Audio tab or press F8. • For incoming Calls Calls - The notification message will automatically be started on incoming calls only. • Yes - When a recording of any call starts, the notification message is played automatically.
When a recording is started, the application ‘wakes up’ and will show a red dot in the system tray. To get the application on screen when it is not recording • Click the Icon in the System tray 3.3.6 Security It is possible to protect the Pico application with a password. password Deleting of recordings and settings of the program can be protected separately. • Check the item you want to protect.. • Enter the password. • Click ‘Apply’ to save the password.
4 Playback and recording In this section the functions of the Playback and recording controls will be explained. 4.1 Normal playback Select a recording and click the Play button to play it back, or doubleclick on a recording to play it, or right-click on it and select Play. 4.2 Playback in a call To playback a recording or another audio file on the telephone line, audible for the other party.
• Select the option ‘Play notification message’ . • Press F8 on your keyboard Or 4.2.1 Playback and recording control display To play back a recording: • Select a specific recording in the archive • Use the recorder keys to start playback. or • Double-click the recording • . The recorder key functions resemble the ordinary recorder key functions. A: B: C: D: E: F: G: Moves the playback position backward. backward Keep the key pressed to repeat and increase speed.
4.2.3 Playback by the Pico device When your PC does not have a soundcard, The speakers can be connected directly to the Pico device. (with Mono sound from the right speaker only) Note: Note When you use this configuration, audio that is played back might be audible for someone you are calling. • • Select a specific recording in the archive Use the recorder keys to start playback. • Double-click the recording. . or 4.3 Automatic recording. If you have chosen to automatically record all calls, ( see § 3.
Choose ‘Add new entry’ if the information you want to add is new. • Enter the new information • Choose ‘Use existing entry’ if the information (like name and number) you want to add already exist in the database. • Select from the drop down • Click OK when finished.
5 Layout of the software When the software is started the program looks like this: These are the items on the main screen: The main Menu (at the top) The playback and recording controls (at the top) The buttons on the left The three tabs: List, Search, Audio at the bottom left The list of recordings (the large remaining area) 5.1 Main Menu The main Menu gives access to File, View, List, Actions, Options and Help. In this chapter we will explain the menu options. 5.1.
5.1.2 View The View menu has six options: ‘Display the List Tab’, ‘Display the Search Tab’s, ‘Display the Audio Tab’, ‘Status Window’, ‘Status window: Only show recording devices’ and ‘Move to system tray’ (see also §3.3.5). The ‘Display…’ options open the corresponding Tab to the left of the List view in the main screen. The option ‘Status Window’ view puts a small status window on top of all other running applications in which the status of the connected device is shown.
The application is activated and back on screen the moment a recording starts, if you chose Automatic recording and checked the checkbox ‘Restore out of system tray…’ in Options – Setup – Display. If you have chosen the Manual recording option, you will have to bring the application back on screen as described below. To retrieve the application from the System tray • Click the Icon once Or • Right click the icon in the System tray and • Choose ´Show´. 5.1.3 List Recordings are saved to a database.
• Use the SHIFT + Delete keys to permanently delete a recording without moving it to the recycle bin first. The deleted recordings end up in the Recycle Bin. They are still in an archive. To Permanently delete the recordings: • Press ‘View Recycle Bin’ • Select the recordings you want to delete permanently • Right click and choose ‘Delete’.
To CD This function is used to back up an entire database or a selection of recordings on CD. Note that you need to use a separate CD-writing application for actually writing the files to CD. If you do not want to burn the entire database on CD • Use the Search Tab to make a selection of the recordings you want to back up on CD. • Go to the Actions menu and • Choose To CD. A dialogue opens. If you want to copy the entire database on CD the options ‘ Selection’ and ‘ Active Query’ are greyed out.
The Export directory is the storage location. The location can be changed to your convenience. Recording properties can be preserved in the filename of the recordings: You can add ‘placeholder’ in the filename that will be automatically filled in. These placeholders start with a percent sign (%) followed by a character.
Sub archives It is possible to combine separate Archives into one new Archive. The new Archive will be the ‘Current Archive’ the archives filled by the different Pico’s are referred to as Sub Archive. For example, a Supervisor may have access to a set of Pico Archives. These Archives should be on an accessible location for the supervisor like a network drive. The combined Archive is created by copying new recordings from the ‘Sub Archives’ to the ‘Current Archive’.
5.2 List, Search and Audio buttons 5.2.1 The List button The List button displays the List view. To the left are the buttons with which a selection for the view can be made. To the right, the main screen, displays the (selection from) current archive. 5.2.2 The Search button In the Search tab, you can define a Search. A Query based on a recording's date, week, time of day, duration, device, telephone number, name or notes.
5.2.3 The Audio button The Audio button is a shortcut to the Audio options. It is possible to set the software up to open the Audio Tab on receiving a telephone call. The Audio tab has four options; Playback File in Call, Play back recording in call, Play notification message and Start Monitoring.
Playback Recording in call To playback a recording on the telephone line, audible for the other party: • Open the Audio tab and • Click the button ‘Playback recording in call • Select the file you want to play back by double clicking it. Or • Open the Actions menu and select the option ‘Playback recording in call ‘. • Select the file you want to play back by double clicking it.
6 Problem solving 6.1 Restoring your soundcard The hardware installation of a Pico will make this device the preferred sound device of your computer because it is the last device added to your configuration. If you have a soundcard in your system and you use it for other applications it is advised to restore the original sound device as preferred device again. This is done as follows: • Click Windows Start in the lower left corner on the taskbar in your computer screen • Select the “Control Panel”.
When the Stop time is set too high, there is a chance that more calls, especially calls shortly after each other, are recorded as one recording. 6.4 Problem with playback volume slider If you move the volume slider and nothing happens, it is possible the software chose the wrong channel for playback. This could occur if the name of the channel on your soundcard is not the same as the name of the channel chosen by the software. • Go to Options – Devices and change the “Recording Recording Channel”.
If this occurs, it may be a hardware problem. The Pico probably does not detect the telephone is on or off hook, because the line voltage detection level is too low. The line voltage detection level can be increased by removing the jumper from within the Pico. This is what you should do: Disconnect the Pico from the Telephone (line) and from the PC. You’ll need a pair of tweezers (preferable plastic). After that, follow the instructions below.
2 - Now locate the jumper, (a small black plastic square), there is only one jumper inside the Pico. It is located against the side of the smaller of the two telephone line connectors and it is marked JP1 . 3 - Remove the jumper from the pins.
4 - Close the Pico’s case. Connect and re-install the Pico and try if it is working properly now. It should now be able to detect whether the telephone is on or off hook.
7 Software Update Online The Pico software has the ability to check for software updates and to download them from the internet. • • • Choose Help in the menu Select Check for update. Click Check Update The fixes of the last update are displayed. • Press Download to start downloading the update. • When downloading is finished the new version will be installed. For this function an Internet connection is required.
8 Acknowledgements 8.1 Privacy When recording telephone conversations the privacy of your conversation partner must be considered. In some countries there is an obligation to notify your conversation partner of the recording. Check your national legal obligations on this and other issues concerning the use of the Call Recorder. In the United States, the Federal government requires that only one person involved in a conversation must know the call is being recorded. However, each state has legislation.
Appendix A The Call Recorder Pico has an ‘automation interface’ with which developers of for instance Call centre software can control the Pico’s software. This means that Start and Stop of recordings and Archive location can be controlled by external software. The ActiveX automation server is called SCR.Recording. SCR.Recording The following functions are available: SetPreStartPeriod(Seconds : int) Add a number of seconds before the StartRecording signal to the recording when available.
Example Visual Basic Script: (example.vbs) sub TestPico() ' When the Pico software is not started, it will be started. set obj = WScript.CreateObject("SCR.Recording") ' wait until user clicks Ok ' State returns 0 when recording not active, ' and 1 when recording is active ' and -1 when device-id is invalid msgbox "Pico is started. State: " & obj.State(1) ' Add a number of seconds before the StartRecording signal ' to the recording when available. ' Maximum is 30 seconds. obj.
INDEX A Acknowledgements, 43 analogue telephone line, 8 archives, archives 30, 33 Automatic Gain Control, Control 16 Automatic recording, recording 16 C Control Panel, 37 D Device is connected, connected 15 device settings, 14 Duration, Duration 19 M Multimedia, 37 N notes, 25 Notification, 19 P password, 22 Pico, 8 Playback, 18, 23, 24, 25, 35, 36 Privacy, 43 protect, 22 R E E-mail, mail 32 Export, Export 30, 31, 32 F Frequency, Frequency 18 G Getting started, 8 I Icon, Icon 14 Import, Import 30,