
Troubleshooting guide


PAGE 18 of 36 VR GSM DOOR INTERCOM TECHNICAL MANUAL VER2.0.0
OPTIONAL ?: Most of the commands support the ? feature. When this is
added to the end of the text message, a confirmation text
message will be sent back to the sender indicating the new
data has been received and stored.
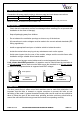
When sending text messages there may be a delay from when you send the message to
when it is received by the intercom panel depending on how congested the network is. If
you are at the door panel when sending the message you will here a single beep from the
intercom panel to indicate it has receive the message.
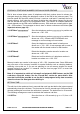
STORING A CALL BUTTON TELEPHONE NUMBER
Telephone numbers can be stored for the ten available call buttons. Each call button can
call up to two telephone numbers (If the first is busy or not answered in a certain time it
can call the second number if the divert facility is setup). The messages to store/check
numbers are as follows (See important note on page 18):-
1111STNnnn”yyyyyyyyyyy” Store the telephone number yyyyyyyyyyy in position nnn
1111STNnnn”yyyyyyyyyyy”? Store the telephone number yyyyyyyyyyy in position nnn
and send a confirmation text message to confirm
storage of new number.
1111STNnnn? Query the telephone number stored in location nnn. A
text message will be sent to the sender with the stored
number for that location.
1111STNnnn”” Delete the telephone number stored in location nnn.
1111STNnnn””? Delete the telephone number stored in location nnn. A
text message will be sent to the sender with the delete
confirmation for that location.
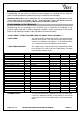
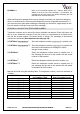
nnn can be found using the following table. The telephone number y can be a maximum of
19 digits.
Call Button Memory location (nnn) of
first number called
Memory location (nnn) of
divert to number to call
Button 1 (C1 & a) 001 011
Button 2 (C1 & b) 002 012
Button 3 (C1 & c) 003 013
Button 4 (C1 & d) 004 014
Button 5 (C1 & e) 005 015
Button 6 (C2 & a) 006 016
Button 7 (C2 & b) 007 017
Button 8 (C2 & c) 008 018
Button 9 (C2 & d) 009 019
Button 10 (C2 & e) 010 020
Use the chart on page 26 to record the telephone numbers stored.