
Owner's manual


Page. 11 DTRXDC 2900
Use of the alarm contacts
The DTRXDC receiver is fitted with 4 alarm contacts; they are associated with the first four preset positions; as soon
as the alarm is activated, the positioning device and the lens adopt the corresponding preset position; the last alarm
activated takes always priority. The DTRXDC can also receive an alarm command even through the DCS3 control
keyboard (which in turn receives it from the SW328 matrix); in such case the positioning device and the lens move
themselves into the preset position N
° 1.
In order to use the alarm contacts it is necessary to set the SW3 according to the following instructions:
• switch 2 of SW3 set to the ON position: the alarm contacts are activated
• switch 2 of SW3 set to the OFF position: the alarm contacts are deactivated
• switch 3 of SW3 set to the ON position: the alarm contacts are normally closed
• switch 3 of SW3 set to the OFF position: the alarm contacts are normally open
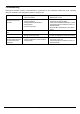
Setup of the receiver for the PRESET functions
- set SW2 according to the following table:
SWITCH MEANING POSITION FUNCTION
1
Enabling of the preset for the PAN function ON predefinable PAN
OFF non-predefinable PAN
2
Enabling of the preset for the TILT function ON predefinable TILT
OFF non-predefinable TILT
3
Enabling of the preset for the ZOOM function ON predefinable ZOOM
OFF non-predefinable ZOOM
4
Enabling of the preset for the FOCUS function ON predefinable FOCUS
OFF non-predefinable FOCUS
5
Enabling of the preset for the IRIS function ON predefinable IRIS
OFF non-predefinable IRIS
Functioning of AUX2
Switches: switch 4 of SW3
Settings:
• switch 4 of SW3 set to OFF: normal function
• switch 4 of SW3 set to ON: AUX2 activated when there is an alarm in function and deactivated when
the alarm stops
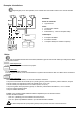
Testing the DTRXDC receiver
After having connected the Pan & Tilt and the lens, for the correct working of the devices, it’s necessary to performe
an automatic test.
Warning! Since during this phase the positioning devices makes automatically some predetermined
movements, do not lean on during the test and do not obstruct its trajectory.
Proceede according to the following indications:
1. identify the two switches, the test one (green) and the reset one (red)
2. power the receiver on
3. keep pushing the green switch
4. to reset the receiver just push the red switch (keep pushing the green switch)
5. after about one second, at the beginning of the reset, release the green switch