
User's Manual
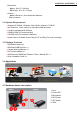

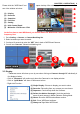
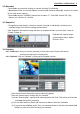
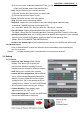
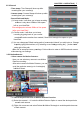
Table Of Contents

CHAPTER 2. INSTALLATION | 3
2.1 Camera Installation
1. Connect the camera to the accessory omni-directional
bracket and fasten it tight.
2. Loosen the side rotator of the bracket (* over-loosening
may cause the camera to fall) and fasten it after setting
the camera a proper orientation for the best surveillance.
3. Stick the accessory screws through the screw hole to
the screw shells on the wall.
4. Connect DC5V adapter to DC5V input port
2.2 Driver Installation
* Do not connect WiDiGuard Receiver to computer before driver installation.
2.2.1 Please insert "Multimedia Installation Kit" CD-ROM into your CD-ROM drive; AutoRun
will running. (if AutoRun didn’t run, please go to “My Computer”, click CD-ROM drive)
2.2.2 Please select “WiDiGuard” product.
2.2.3 Please select “Device Driver”
2.2.4 Setup wizard is running. Click "Next"
2.2.5 License Agreement, if you are agreeing to be bound by the terms of this agreement,
please click “I Accept”.
2.2.6 Choose destination location, select folder where setup will install files. Click "Next"
2.2.7 Setup wizard will be completed automatically, please click “Finish”.
2.3 Application Software Installation
2.3.1 Please insert "Multimedia Installation Kit" CD-ROM into your CD-ROM drive; AutoRun
will running. (if AutoRun didn’t run, please go to “My Computer”, click CD-ROM drive)
2.3.2 Please select “WiDiGuard” product.
2.3.3 Please select “Application Software”
2.3.4 Setup wizard is running. Click "Next"
2.3.5 Choose destination location, select folder where setup will install files. Click "Next"
2.3.6 Setup wizard will be completed automatically, please click “Finish”.
After AP software is installed correctly, you should now see the following icon
on your desktop.
2.4 USB Receiver Installation
2.4.1 Properly connect USB receiver to computer USB port.
2.4.2 System will now automatically detect USB receiver,
Please wait for a few minutes.
2.4.3 Please go to Device Manager to check WiDiGuard driver
is installed successful in your computer.