
Installation Guide


13
EN NL FR DE ES SE Appendix
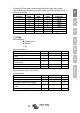
3.11 Pluggable LCD display - History data
The charge controller tracks several parameters regarding the energy
harvest. Enter history data by pressing the SELECT button when in monitor
mode, a scrolling text will be visible. Press + or – to browse the various
parameters as shown in the table below, press SELECT to stop scrolling and
show the corresponding value. Press + or – to browse the various values.
For the daily items it is possible to scroll back to 30 days ago (data becomes
available over time), a brief popup shows the day number. Press SELECT to
leave the historical menu and go back to the monitor mode, alternatively
press SETUP to return to the scrolling text.
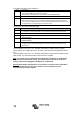
Scrolling text
Icons
(1)
Segments
Units
Displayed info
.
kWh
Total yield
Total error 0 (most recent)
Total error 1 (shown when available)
Total error 2 (shown when available)
Total error 3 (shown when available)
.
V
Total panel voltage maximum
.
V
Total battery voltage maximum
.
Day kWh
Daily yield
.
Day V
Daily battery voltage maximum
.
Day V
Daily battery voltage minimum
Day
Daily error 0 (most recent)
Day
Daily error 1 (shown when available)
Day
Daily error 2 (shown when available)
Day
Daily error 3 (shown when available)
Day
Daily time spent in bulk or ESS (minutes)
Day
Daily time spent in absorption (minutes)
Day
Daily time spent in float (minutes)
Day W
Daily power maximum
.
Day A
Daily battery current maximum
.
Day V
Daily panel voltage maximum
Note:
When the charger is not active (night time) the bulk, absorption and float icons will be shown
as in the table above.
When the charger is active only one icon will be shown: the icon corresponding to the actual
charge state.
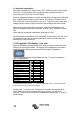
3.12 Pluggable LCD display - Setup menu
a. To enter the SETUP Menu, press and hold the SETUP-button during 3
seconds. The “Menu” icon will light up and a scrolling text is visible.
b. Press the "-" or "+" button to scroll through the parameters.
c. The table below lists, in order of appearance, all parameters which can be
adjusted by pressing the "-" button.
d. Press SELECT: the parameter to change will now blink.
e. Use the "-" or "+" button to chose the desired value.
f. Press SELECT to confirm the change, the value will stop blinking, and the
change is made final.
g. Press SETUP to return to the parameters menu. With the "-" or "+" button
it is now possible to scroll to another parameter that needs change.
h. To return to normal mode, press SETUP during 3 seconds.