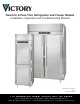
Reach-In & Pass-Thru Refrigerator and Freezer Models Installation, Operation and Troubleshooting Manual Manual Part No. 50707411 Rev. 00 Print Date: 04/12/12 11 0 W o o d c r e s t R o a d , C h e r r y H i l l , N J 0 8 0 0 3 Phone: (856) 428-4200 Fax: (856) 673-0038 E-Mail: parts@victoryrefrigeration.com Website: www.victoryrefrigeration.com order-entry@victoryrefrigeration.com service@victoryrefrigeration.
TH A NK YO U Thank you for purchasing a Victory ULTRASPEC™ Series cabinet! This unit has passed our strict Quality Control Inspection and meets the high standards set by Victory Refrigeration. You have made a quality investment that with proper maintenance will give you many years of service. Please read the following installation and maintenance instructions before installing or using your unit. If you have any questions, please call our Technical Service Department at (800) 523- 5008.
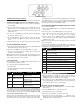
LIMITED WARRANTY (Continental USA Only) The Seller warrants to the original purchaser, equipment manufactured by Seller to be free from defects in material and workmanship for which it is responsible. The Seller’s obligation under this warranty shall be limited to replacing or repairing at Seller’s option, without charge, F.O.B.
Glossary of Common Terms & Descriptions C E Compressor - The compressor is the heart of the system. The compressor does just what it’s name states. It compresses the low pressure refrigerant vapor from the evaporator and compresses it into a high pressure vapor. Energy Saving Mode - A mode automatically activated during periods when the kitchen is not operating. After four (4) hours of no door openings, the cabinet will revert to the energy saving mode.
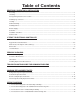
Table of Contents RECEIVING, UNCRATING & INSTALLATION Receiving...................................................................................................................................................................1 Uncrating.....................................................................................................................................................................................1 Storage Refrigerator/Freezer Location.......................................................
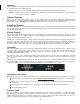
RECEIVING, UNCRATING & INSTALLATION INSTRUCTIONS Proper installation is the first step to operation. We recommend that your refrigerator or freezer be installed by a Victory authorized service technician. Receiving Prior to shipping, all Victory products are factory tested for performance and thoroughly inspected to ensure they are free of any defects. Upon receipt, carefully examine the unit for any damage that may have occurred during shipping and delivery.
Leveling Cabinets must be leveled when installed. Failure to level your cabinet may result in doors not sealing, closing correctly, or condensate water not draining properly. Legs - Rotate the foot of the leg with an adjustable wrench to achieve desired height for leveling. Casters - Cabinets with casters can be leveled by placing large flat washers in between the 1/2” stud and the holes located on the case bottom.
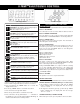
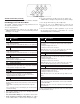
V-TEMP ELECTRONIC CONTROL TM "V-TEMP™ Keypad" "LED Display Window" LED DESCRIPTIONS KEYPAD BUTTONS & FUNCTIONS ON: The compressor is on FLASHING: (1) The working setpoint is being changed; (2) Compressor protection is in progress OFF: The compressor is off KEYPAD BUTTONS *Note: Use "V-TEMP™ Keypad" illustration above to follow these instructions. Button 1: ON/STANDBY Press this button for a few seconds to switch the cabinet on and off.
"V-TEMP™ Keypad" The HACCP LED provides information regarding the memory status of the HACCP alarms. If it is on, not all of the information regarding the HACCP alarms has been displayed. If it flashes, the instrument will have saved at least one new HACCP alarm. KEYPAD FUNCTIONS (continued) *Note: Use "V-TEMP™ Keypad" illustration above to follow these instructions. SETTING DATE & TIME (*required for all ULTRASPEC™ units) a. Press the (4) “DOWN” button for a few seconds,“rtc” will appear on the display.
"V-TEMP™ Keypad" b. To select a parameter to modify use the (5) “UP” button or (4) “DOWN” button to navigate to the parameter you want to change. KEYPAD FUNCTIONS (continued) *Note: Use "V-TEMP™ Keypad" illustration above to follow these instructions. c. Press the (6) “SET” button to go into modify mode. PARAMETER ACCESS AND ADJUSTMENT The V-TEMP™ Electronic Control has many parameters the user can adjust to customize the control. To access the parameters: d.
USER PARAMETERS *Refer to the "PARAMETER ACCESS & ADJUSTMENT" section on page 5. Label Refrigerator Setting Factory Preset Name Freezer Setting Factory Preset Unit Minimum Maximum 0 -1 °F -25 25 °F °F - °C (0) °F (1) 2 4 °F 0 99 Measure Input Configuration Parameters CA1 Cabinet probe offset This parameter can be used to calibrate the digital display. P2 Celsius/Fahrenheit This parameter is used to change the temperature scale.
USER PARAMETERS (continued) *Refer to the "PARAMETER ACCESS & ADJUSTMENT" section on page 5. Label Name Refrigerator Setting Factory Preset Freezer Setting Factory Preset Unit Minimum Maximum Yes Yes - No Yes Digital Inputs Parameters (continued) i4 Memo door alarm in HACCP This parameter is used to set the type of defrost interval. If real time defrost interval is required, set this to: (4) Calendar. The Hd parameters must be set to the time defrosts are required.
PERIODIC MAINTENANCE Cabinet Cleaning Victory Refrigeration recommends periodic internal and exterior cleaning as outlined below. Daily Exterior Cleaning 1. Clean the surface with a sponge and cleaning solution. Use a non-abrasive cleaner that does not contain chlorine. 2. Polish with a soft cloth, wiping with the grain of the metal. 3. Once a week wipe with a film cutting agent or stainless steel polish to maintain shine. Weekly Interior Cleaning 1. Remove all food, food related items and shelves. 2.
Lubrication Unless otherwise specified, all Victory refrigerators and freezers are equipped with permanently lubricated motors. The compressor-motor is a sealed unit and is constantly lubricated when in operation. The condenser and evaporator fan motors are also equipped with lubricated bearings which never need to be oiled. Installing Replacement Door Gasket (if required) Removing Beginning at one corner, pry the gasket loose from the retaining strip.
TROUBLESHOOTING GUIDE FOR COMMON PROBLEMS Caution: Disconnect Power Supply Prior To Attempting Any Service! PROBLEM Controller Display does not illuminate Cabinet not running Condensing Unit on Refrigerator or Freezer runs for prolonged period or continuously POSSIBLE CAUSE REMEDY Fuse blown or circuit breaker tripped Replace fuse or reset circuit breaker Power cord unplugged Plug in power cord to designated receptacle. Cabinet cannot share same outlet with other equipment.
COMMON REPLACEMENT PARTS Part No.
COMMON REPLACEMENT PARTS Part No.
WIRING DIAGRAMS 1, 2 & 3 Section Refrigerator Wiring Diagram for 115 Volt/15 Amp & 20 Amp 1, 2 & 3 Section Refrigerator Wiring Diagram for 115 Volt/208-230 Volt Condensing Unit 13
1, 2 & 3 Section Freezer Wiring Diagram for 115 Volt/15 Amp & 20 Amp 1, 2 & 3 Section Freezer Wiring Diagram for 115 Volt/208-230 Volt Condensing Unit 14
11 0 W o o d c r e s t R o a d , C h e r r y H i l l , N J 0 8 0 0 3 Phone: (856) 428-4200 Fax: (856) 673-0038 E-Mail: parts@victoryrefrigeration.com Website: www.victoryrefrigeration.com order-entry@victoryrefrigeration.com service@victoryrefrigeration.