Motion Sensor Installation Guide Procedure to Install Motion Sensor
Installation Guide Motion Sensor 2 INSTALLATION This procedure shows you how to install a Motion Sensor. Complete the following steps (in order) to correctly install the Motion Sensor: 1. 2. Install battery. NOTE: When batteries are first installed, the sensor automatically goes into pairing mode. Refer to the Room Controller pairing procedure for commissioning. Remove plastic pull tab. 3. 4. Verify device. Refer to "Verify Sensing Motion" on page 3. Install Motion Sensor.
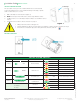
Installation Guide Motion Sensor 3 INSTALL BATTERY 1. 2. 3. 4. Using flathead screwdriver, gently pry cover away from Motion Sensor (Figure 1). Remove any packing tape from inside Motion Sensor. Install one CR2 in Motion Sensor (Figure 2). NOTE: ensure battery polarity is correct. Verify sensing motion. Refer to "Verify Sensing Motion" on page 3. Figure - 1 Figure - 2 LED VERIFY SENSING MOTION 1. 2. 3. 4. 5. Allow three minutes to pass for Motion Sensor to warm-up.
Installation Guide Motion Sensor 4 INSTALL MOTION SENSOR 2-sided tape This procedure shows you how to install the Motion Sensor to the desired location. The Motion Sensor can be installed vertically, horizontally, or upside down on a flat surface or in a corner. 1. 2. 3. 4. Affix 2-sided tape to desired location (Figure 1). NOTE: ensure tape is flush with surface and securely affixed to surface. Set Motion Sensor on 2-sided tape and press firmly to secure Motion Sensor in place. Test Motion Sensor.