
Installation guide Manual


Door/Window Sensor
Installation Guide
3
© 2014 Viconics. All rights reserved.
Viconics Technologies Inc. | 9245 Langelier Blvd. | St.-Leonard | Quebec | Canada | H1P 3K9 | Tel: (514) 321-5660 | Fax: (514) 321-4150
028-6076-00 www.viconics.com | sales@viconics.com October 2014
Figure 3
BATTERY REPLACEMENT
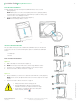
Pull tab and slide open top Housing of Door/Window Sensor to access old
battery (Figure 1).
NOTE: battery does not come out easily. Use plastic tool to gently pry battery
out of unit. Never use any metal tool to perform this procedure as it may cause
a short circuit or cause damage to Device.
1. Install one CR2032 battery in Housing top (Figure 2).
NOTE: ensure battery polarity is correct.
INSTALL SENSOR HOUSING
This procedure shows you how to install the Door/Window Sensor to the desired
location. You can use one of the following two options to install the Door/Window
Sensor:
• 2-sided tape
• Screws
Note orientation in illustration.
Option 1
1. Affix 2-sided tape to desired location (Figure 3).
2. NOTE: ensure tape is flush with surface and securely affixed to surface.
3. Set Sensor on 2-sided tape and press firmly to secure Sensor in place.
4. Test Sensor. Refer to "Device Function" on page 4.
Option 2
1. Using screwdriver, secure Sensor to desired location with two screws (Figure 4).
NOTE: ensure screws are tight and Sensor does not move easily. Do not torque
screws.
2. Test Sensor. Refer to "Device Function" on page 4.
Figure - 1 Figure - 2
Figure 4
• Always test Device before leaving job site.
• Avoid installing Device directly on metal surfaces.
Installation on metal can reduce transmission range.
• Ensure Device is installed in dry location away from
water, moisture, and rain.