Door/Window Sensor Installation Guide Procedure to Install Door/Window Motion Sensor
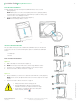
Installation Guide Door/Window Sensor 2 INSTALLATION This procedure shows you how to install a Door/Window Sensor. Complete the following steps to correctly install the Door/Window Sensor: 1. 2. 3. 4. 5. Install battery. NOTE: ensure battery polarity is correct. NOTE: When batteries are first installed, the sensor automatically goes into pairing mode. Refer to the Room Controller pairing procedure for commissioning. Pull plastic tab Install Sensor Housing. Install Magnet. Install Sensor.
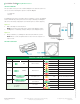
Installation Guide Door/Window Sensor 3 BATTERY REPLACEMENT Pull tab and slide open top Housing of Door/Window Sensor to access old battery (Figure 1). NOTE: battery does not come out easily. Use plastic tool to gently pry battery out of unit. Never use any metal tool to perform this procedure as it may cause a short circuit or cause damage to Device. 1. Install one CR2032 battery in Housing top (Figure 2). NOTE: ensure battery polarity is correct.
Installation Guide Door/Window Sensor 4 INSTALL MAGNET This procedure shows you how to install the Magnet to the desired location. You can use one of the following two options to install the Magnet: • 2-sided tape • Screws Install Magnet in the proper orientation using 2-sided tape or screws. The Magnet must be within 0.75in (1.9cm) of the Sensor. If using 2-sided tape, the Magnet’s tab can be removed by snapping the screw tab along the scored line (Figure 1). Option 1 1. 2.