Ceiling Motion Sensor Installation Guide Procedure to Install Ceiling Motion Sensor
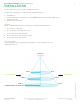
Installation Guide Ceiling Mounted Sensor 2 INSTALLATION This procedure shows you how to install a Ceiling Mounted Sensor. Complete the following steps to correctly install the Ceiling Mounted Sensor: 1. 2. 3. 4. Install batteries. Pair Sensor with Room Controller. Refer to Pairing VT8000 Series Room Controller with ZigBee Sensors. Verify sensing motion. Install Sensor to ceiling surface. Location Always consider the following location constraints before installing Ceiling Mounted Sensor: 1.
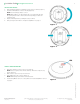
Installation Guide Ceiling Mounted Sensor 3 INSTALL BATTERIES 1. 2. 3. Remove Mounting Plate by rotating Housing counter-clockwise (Figure 1). Install two AAA batteries in Sensor Housing (Figure 2). NOTE: ensure battery polarity is correct. NOTE: When batteries are first installed, the sensor automatically goes into pairing mode. Refer to the Room Controller pairing procedure for commissioning. Replace Mounting Plate by rotating Housing clockwise. 4. Verify sensing motion.
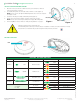
Installation Guide Ceiling Mounted Sensor 4 INSTALL CEILING MOTION SENSOR 1. 2. 3. 4. 5. Observe Sensor placement conditions before you install Sensor. Refer to "Sensor Placement" on page 2. Secure Mounting Plate to overhead surface with two screws (Figure 1). NOTE: ensure screws are tight and Mounting Plate does not move easily. Do not torque screws. Set Sensor Housing assembly on Mounting Plate (Figure 2). Mounting Plate Rotate Sensor Housing assembly clockwise until it locks in place.