
Installation & Assembly
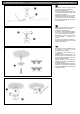


ASSEMBLY INSTRUCTIONS
INSTRUCCIONES DE MONTAJE MONTAGEANLEITUNG
D
ES
EN
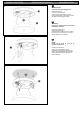
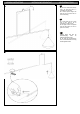
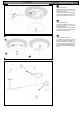
12.
Roscar la pieza (H) con la mano
sin ayuda de herramientas. Para
acabar de roscar utilizar la llave (I)
suministrada.
IMPORTANTE: Roscar la pieza (H)
hasta que quede enrasada con la
parte superior de la pantalla.
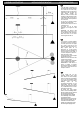
13. Para regular la inclinación y
altura de la caña, aflojar la espiga y
tirar de los cables de acero hasta
que le quede en la posición
deseada. Al finalizar, volver a
apretar la espiga.
12
.
Turn the element (H) by hand
without the use of any tools. In order
to complete the action use the key
supplied (I).
IMPORTANT: Screw the element
(H) until it is level with the upper part
of the shade.
13. In order to regulate the
inclination and the height of the rod
loosen the spigot and pull through
the steel cables till the required
position is achieved. To finalise
tighten the spigot again.
12.
Schrauben Sie das Teil (H) von
Hand ein, nutzen Sie keine
Werkzeuge. Zum endgültigen
Festziehen nutzen Sie bitte den
mitgelieferten Schlüssel (I).
WICHTIG: Schrauben Sie das Teil
(H) soweit ein, bis es im oberen
Bereich des Lampenschirms
versenkt ist.
13. Zur Einstellung der Neigung und
Höhe der Leuchtstange lösen Sie
den Gewindestift und ziehen Sie am
Stahlseil, bis die gewünschte
Position eingestellt ist. Sodann
befestigen Sie den Gewindestift
wieder.
13
12