
Installation & Assembly


ASSEMBLY INSTRUCTIONS
INSTRUCCIONES DE MONTAJE MONTAGEANLEITUNG
ES
EN
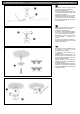
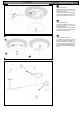
10.
Montar el cuerpo (F) al soporte
techo de forma que queden bien
encarados los orificios de fijación de
los tornillos (C), y montar estos usando
la llave allen mas grande.
11. Conectar los terminales (G) del
cable suministrado y de la pantalla.
Asegurarse que están bien
conectados.
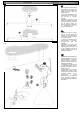
IMPORTANTE: Si se montan varias
referencias, no intercambiar pantallas.
Montar la pantalla cuya referencia de
su caja de embalaje coincida con la
etiqueta (T) enganchada en el cable. Al
final retirar esta etiqueta.
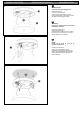
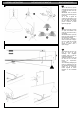
10.
Piece together the body (F) with the
ceiling support in such a way that the
openings for the screw fixings (C) face
together, and fix them in place using
the larger Allen key.
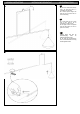
11. Connect the terminals (G) of the
supplied cable and the shade. Make
sure that they are completely
connected.
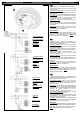
IMPORTANT: In the case of several
models being assembled the shades
should not be mixed-up. Fit the shade
with the reference number that
coincides with the label (T) attached to
the corresponding cable. On
completion remove the label.
10.
Positionieren Sie den Stabhalter (F)
über dem Verbindungsteil so, dass die
Schraubenöffnungen übereinander-
liegen und schrauben Sie (C) den
Stabhalter mittels des größeren der
mitgelieferten Schlüssel fest.
11. Verbinden Sie die Klemmen (G)
des mitgelieferten Kabels und des
Leuchtenschirms. Achten Sie auf einen
korrekten Anschluss.
WICHTIG: Wenn Sie verschiedene
Leuchtenmodelle montieren, achten
Sie darauf, dass Sie die Schirme nicht
vertauschen. Montieren Sie nur
Leuchtenschirme, deren
Referenznummer auf der Verpackung
der auf dem Etikett am Kabel (T)
entspricht. Entfernen Sie anschließend
dieses Etikett.
D
10
11