
Installation & Assembly


ASSEMBLY INSTRUCTIONS
INSTRUCCIONES DE MONTAJE MONTAGEANLEITUNG
6
D
ES
EN
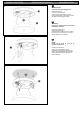
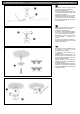
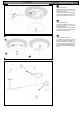
6.
Quitar los dos tornillos (C) con la llave allen mas
grande suministrada, y extraer la pieza (D).
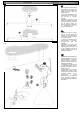
7. Desenroscar el soporte techo (E).
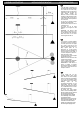
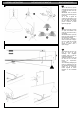
8. Teniendo en cuenta las distancias indicadas en
el punto 1, fijar el soporte (E) al techo utilizando el
taco y tornillo mas adecuado (no suministrados)..
IMPORTANTE: La cabeza de los tornillos tiene
que ser avellanada y no sobresalir de su
alojamiento.
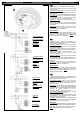
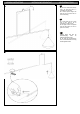
9. Roscar a tope la pieza (D) en el soporte (E), y
apretar las dos espigas laterales con la llave allen
más pequeña suministrada.
6.
Remove the screws (C) using the Allen key
provided and remove the piece indicated (D).
7. Unscrew the ceiling support (E).
8. Bearing in mind the distances indicated in point
1, fix the support (E) to the ceiling using the correct
plug and screw (not supplied).
IMPORTANT: The heads of the screws must be
countersunk and not protrude from their lodging.
9. Screw the top of the piece (D) into the support
(E) and press both side spigots with the smaller of
the Allen keys provided.
6.
Entfernen Sie mit dem mitgelieferten Schlüssel
die Schrauben (C) und lösen Sie das
Verbindungsteil (D) vom Stabhalter.
7. Schrauben Sie den Deckenhalter (E) vom
Verbindungsteil ab.
8. Bedenken Sie die Abstände aus Punkt 1 und
befestigen Sie dann den Deckenhalter (E) mit
passendem Dübel und Schraube an der Decke
(Nicht im Lieferumfang enthalten).
WICHTIG: Benutzen Sie eine Schraube mit
Senkkopf – der Schraubenkopf darf keinesfalls aus
dem Bauteil herausragen.
9. Schrauben Sie das Verbindungsteil (D) bis zum
Anschlag in den Deckenhalter (E), befestigen Sie
die seitlichen Gewindestifte mit dem kleinsten der
mitgelieferten Schlüssel.
7
8
9